The Experiment Factory

Nobody ever comes in… and nobody ever comes out…
And that's the way that reproducible behavioral experiments should be: designed, captured, and used again with assurance of running the same thing. The Experiment Factory software will help you create a reproducible container to deploy behavioral experiments. Want to jump right in? Choose one of our demo containers, and browse to localhost:
docker run -p 80:80 vanessa/expfactory-games start
docker run -p 80:80 vanessa/expfactory-surveys start
docker run -p 80:80 vanessa/expfactory-experiments start
If you want a more gentle introduction, start with reading some background on containers and why the Experiment Factory exists in the first place. Then move on to our quick start to generate your own experiment container. Please give feedback about your needs to further develop the software. The library will show you a selection to choose from, including all experiments, surveys, and games migrated from the legacy Expfactory. If you have web-based experiments to contribute, please reach out! Your contributions and feedback are greatly appreciated!
User Guide
- Background for a gentle introduction to containers before the quick start.
- Generate quick starts to generating containers.
- Customize customize container and runtime variables, the database, and other settings.
- Usage of an experiment factory container.
- Integrations including automated experiment testing robots, generators, and third party tools.
Developer Guide
- Contribute an experiment to the library for others to use.
- Interactive Development suggested practice to develop and debug an experiment interactively in the container
Library
- Browse our available experiments [json].
- Generate a custom container from our Library, or
- Recipes view a pre-generated recipe based on tags in the library.
Citation
If the Experiment Factory is useful to you, please cite the paper to support the software and open source development.
Sochat, (2018). The Experiment Factory: Reproducible Experiment Containers.
Journal of Open Source Software, 3(22), 521, https://doi.org/10.21105/joss.00521

If you are using the Legacy software please cite this paper.
Sochat VV, Eisenberg IW, Enkavi AZ, Li J, Bissett PG and Poldrack RA (2016)
The Experiment Factory: Standardizing Behavioral Experiments.
Front. Psychol. 7:610. doi: 10.3389/fpsyg.2016.00610
Support
You’ll notice a little eliipsis () next to each header section. If you click this, you can open an issue relevant to the section, grab a permalink, or suggest a change. You can also talk to us directly on Gitter.

We are here for you! You can ask a question directly or open an issue for:
If your issue is for a particular experiment, open the issue at the respective repository for the expfactory-experiments organization.
Generate an Experiment Container
Really Quick Start
Pull our pre-generated example containers, and start! Your experiment portal is at http://127.0.0.1 in your browser.
docker run -p 80:80 vanessa/expfactory-experiments start
docker run -p 80:80 vanessa/expfactory-surveys start
docker run -p 80:80 vanessa/expfactory-games start
These container recipes are derived from tags in our library. Feel free to use one for the examples below.
Quick Start
Make a folder. This will be a place to generate your Dockerfile.
mkdir -p /tmp/my-experiment/data
cd /tmp/my-experiment
What experiments do you want in your container? Let’s see the ones that are available!
docker run quay.io/vanessa/expfactory-builder list
Cool, I like digit-span, spatial-span, test-task, and tower-of-london. Notice here
that we are running as our user so the resulting files don’t have permissions issues.
docker run -v $PWD:/data --user "$(id -u):$(id -g)" \
    quay.io/vanessa/expfactory-builder build \
    digit-span spatial-span tower-of-london test-task
Let’s build the container from the Dockerfile! We are going to name it expfactory/experiments
docker build -t expfactory/experiments .
Now let’s start it.
docker run -v /tmp/my-experiment/data/:/scif/data \
           -d -p 80:80 \
           expfactory/experiments start
Open your browser to localhost (http://127.0.0.1) to see the portal portal. For specifying a different database or study identifier, read the detailed start below, and then how to customize your container runtime. When you are ready to run (and specify a particular database type) read the usage docs.
Detailed Start
The generation of a container comes down to adding the experiments to a text file that records all the commands to generate your container. Since we are using Docker, this file will be the Dockerfile, and you should install Docker first and be comfortable with the basic usage. In these sections, we will be building your container from a customized file. You will be doing the following:
- generating a recipe with (reproducible) steps to build a custom container
- building the container!
Note that if you want to deploy a container with https, you should read our https generation page, and then come back here to read about interaction with your container.
The Expfactory Builder Image
Both of these steps start with the expfactory builder container.
We’ve provided an image that will generate a Dockerfile, and from it you can build your Docker image.
Note that bases for expfactory were initially provided on Docker Hub and have moved to Quay.io. Dockerfiles in the repository that use the expfactory-builder are also updated. If you need a previous version, please see the tags on the original Docker Hub. We don’t build the image within the same
container for the explicit purpose that you should keep a copy of the recipe
Dockerfile at hand. The basic usage is to run the image, and you can either build, test, or list.
$ docker run quay.io/vanessa/expfactory-builder

Usage:

          docker run quay.io/vanessa/expfactory-builder list
          docker run quay.io/vanessa/expfactory-builder build experiment-one experiment-two ...
          docker run -v experiments:/scif/apps quay.io/vanessa/expfactory-builder test
          docker run -v $PWD/_library:/scif/apps quay.io/vanessa/expfactory-builder test-library
We will discuss each of these commands in more detail.
Library Experiment Selection
The first we’ve already used, and it’s the only required argument. We need to give the
expfactory builder a list of experiments. You can either browse
the table or see a current library list with list.
We also have some pre-generated commands in our recipes portal.
Here is how to list all the experiments in the library:
docker run quay.io/vanessa/expfactory-builder list

Expfactory Version: 3.0
Experiments
1  adaptive-n-back	https://github.com/expfactory-experiments/adaptive-n-back
2  breath-counting-task	https://github.com/expfactory-experiments/breath-counting-task
3  dospert-eb-survey	https://github.com/expfactory-experiments/dospert-eb-survey
4  dospert-rp-survey	https://github.com/expfactory-experiments/dospert-rp-survey
5  dospert-rt-survey	https://github.com/expfactory-experiments/dospert-rt-survey
6  test-task	https://github.com/expfactory-experiments/test-task
7  tower-of-london	https://github.com/expfactory-experiments/tower-of-london
Try using grep if you want to search for a term in the name or url
docker run quay.io/vanessa/expfactory-builder list | grep survey
2  alcohol-drugs-survey	https://github.com/expfactory-experiments/alcohol-drugs-survey
4  dospert-eb-survey	https://github.com/expfactory-experiments/dospert-eb-survey
5  dospert-rp-survey	https://github.com/expfactory-experiments/dospert-rp-survey
6  dospert-rt-survey	https://github.com/expfactory-experiments/dospert-rt-survey
Local Experiment Selection
If you have experiments on your local machine where an experiment is defined based on these criteria or more briefly:
- the config.json has all required fields
- the folder is named according to the
exp_id - the experiment runs via a main index.html file
- on finish, it POSTS to
/saveand then proceeds to/next
Then you can treat a local path to an experiment folder as an experiment in the list to give to build. Since we will be working from a mapped folder in a Docker container, this comes down to providing the experiment name under the folder it is mapped to, /data. Continue reading for an example
Dockerfile Recipe Generation
To generate a Dockerfile to build our custom image, we need to run expfactory in the container, and mount a folder to write the Dockerfile. If we are installing local experiments, they should be in this folder. The folder should not already contain a Dockerfile, and we recommend that you set this folder up with version control (a.k.a. Github). That looks like this:
mkdir -p /tmp/my-experiment/data
docker run -v /tmp/my-experiment:/data \
              quay.io/vanessa/expfactory-builder \
              build tower-of-london

Expfactory Version: 3.0
LOG Recipe written to /data/Dockerfile

To build, cd to recipe and:
              docker build -t expfactory/experiments .
If you are building from local experiment folders, then it is recommended to generate the Dockerfile in the same folder as your experiments. You should (we hope!) also have this directory under version control (it should have a .git folder, as shown in the example below). For example, let’s say I am installing local experiment test-task-two under a version controlled directory experiments, along with test-task from the library. The structure would look like this:
experiments/
├── .git/
└── test-task-two
I would then mount the present working directory (experiments) to /data in the container, and give the build command both the path to the directory in the container data/test-task-two and the exp_id for test-task, which will be retrieved from Github.
docker run -v $PWD:/data \
              quay.io/vanessa/expfactory-builder \
              build test-task \
                    /data/test-task-two

Expfactory Version: 3.0
local experiment /data/test-task-two found, validating...
LOG Recipe written to /data/Dockerfile
WARNING 1 local installs detected: build is not reproducible without experiment folders

To build, cd to directory with Dockerfile and:
              docker build -t expfactory/experiments .
Note that it gives you a warning about a local installation. This message is saying that if someone finds your Dockerfile without the rest of the content in the folder, it won’t be buildable because it’s not obtained from a version controlled repository (as the library experiments are). We can now see what was generated:
experiments/
├── .git/
├── Dockerfile
├── startscript.sh
└── test-task-two
This is really great! Now we can add the Dockerfile and startscript.sh to our repository, so even if we decide to not add our experiments to the official library others will still be able to build our container. We can also inspect the file to see the difference between a local install and a library install:
########################################
# Experiments
########################################


LABEL EXPERIMENT_test-task /scif/apps/test-task
WORKDIR /scif/apps
RUN expfactory install https://github.com/expfactory-experiments/test-task

LABEL EXPERIMENT_test-task-two /scif/apps/test-task-two
ADD test-task-two /scif/apps/test-task-two
WORKDIR /scif/apps
RUN expfactory install test-task-two
The library install (top) clones from Github, and the local install adds the entire experiment from your folder first. This is why it’s recommended to do the build where you develop your experiments. While you aren’t required to and could do the following to build in /tmp/another_base:
docker run -v /tmp/another_base:/data \
              quay.io/vanessa/expfactory-builder \
              build test-task /data/test-task-two
and your experiments will be copied fully there to still satisfy this condition, it is more redundant this way.
Finally, before you generate your recipe, in the case that you want “hard coded” defaults (e.g., set as defaults for future users) read the custom build section below to learn about the variables that you can customize. If not, then rest assured that these values can be specified when a built container is started.
Examples
Repeated Measures Designs
A common scenario is an experiment where you use the same task multiple times.
For expfactory, you would want the same task associated with a different experiment identifier (exp_id)
and separate blocks in the battery of experiments. For example, suppose:
- you want to measure the effect of two different task variations or blocks of the Attention Network Test (ANT).
- you can assign participants to each task using participant variables.
Thus, you would want a container that runs a baseline ANT, possibly other tasks, and then runs the ANT for a second time. Because each task requires a unique name, you can use local experiments to build a container that runs the ANT twice.
Generate your Dockerfile with the tasks that you want to run between the two ANT measurements.
What we are basically going to do is copy an entire folder, and rename the experiment id
to correspond with the renamed folder. This comes down to first adding the
following lines to your Dockerfile to build the two ant tasks:
LABEL EXPERIMENT_ant1 /scif/apps/ant1
ADD ant1 /scif/apps/ant1
WORKDIR /scif/apps
RUN expfactory install ant1

LABEL EXPERIMENT_ant1 /scif/apps/ant2
ADD ant2 /scif/apps/ant2
WORKDIR /scif/apps
RUN expfactory install ant2
Next, clone the repository into your build folder, and rename it:
$ git clone https://github.com/earcanal/attention-network-task
$ mv attention-network-task/ ant1
Set exp_id to match the folder name in ant1/config.json:
"exp_id": "ant1",
Repeat this cloning/renaming process, giving the second folder the name ant2.
You can now build a container with two ANT tasks that you can run before and after your treatment tasks. You can repeat this process as many times as you like in case you need more than two measurements from the same task/survey.
Container Generation
Starting from the folder where we generated our Dockerfile, we can now build the experiment container. Note that when you have a production container you don’t need to build locally each time, you can use an automated build from a Github repository to Docker Hub - this would mean that you can push to the repository and have the build done automatically, or that you can manually trigger it. For this tutorial, we will build locally:
experiments/
├── Dockerfile
└── startscript.sh
and if we have local experiments, we would see them as well:
experiments/
├── Dockerfile
├── startscript.sh
└── test-task-two/
At this point we recommend you add LABELS to your Dockerfile. A label can be any form of
metadata to describe the image. Look at the label.schema for
inspiration. Then build the image, and replace expfactory/experiments with whatever namespace/container you
want to give to the image. It’s easy to remember to correspond to your Github repository (username/reponame).
docker build -t expfactory/experiments .

# if you don't want to use cache
docker build --no-cache -t expfactory/experiments .
Don’t forget the . at the end! It references the present working directory with the Dockerfile. If you are developing and need to update your container, the fastest thing to do is to change files locally, and build again (and removing –no-cache should be OK).
Start your Container
After you do the above steps, your custom container will exist on your local machine. First, let’s pretend we haven’t a clue what it does, and just run it:
$ docker run expfactory/experiments

    Usage:

         docker run <container> [help|list|test-experiments|start]
         docker run -p 80:80 -v /tmp/data:/scif/data <container> start

         Commands:

                help: show help and exit
                list: list installed experiments
                lib: list experiments in the library
                test: test experiments installed in container
                start: start the container to do the experiments*
                env: search for an environment variable set in the container

         *you are required to map port 80, otherwise you won't see the portal at localhost

         Options [start]:

                --db: specify a database url to override the default filesystem
                                 [sqlite|mysql|postgresql]:///

                --studyid:  specify a studyid to override the default

         Examples:

              docker run <container> test
              docker run <container> list
              docker run <container> start
              docker run -p 80:80 <container> --database mysql+pymysql://username:password@host/dbname start
              docker run -p 80:80 <container> --database sqlite start
              docker run -p 80:80 <container> --database postgresql://username:password@host/dbname start
Note that you can list installed experiments with list and library experiments with lib.
The command we are interested in is start, and the important (Docker) arguments are the following:
port: The-p 80:80is telling Docker to map port 80 (the nginx web server) in the container to port 80 on our local machine. If we don’t do this, we won’t see any experiments in the browser!volumes: The second command-vis telling Docker we want to see the output in the container at/scif/datato appear in the folder/tmp/dataon our local machine. If you are just testing and don’t care about saving or seeing data, you don’t need to specify this.
For this first go, we aren’t going to map the data folder. This way I can show you how to shell inside an interactive container.
Without SSL
Remember, the above is without SSL (https)! If you want to deploy an https container, see these docs.
docker run -p 80:80 expfactory/experiments start

Starting Web Server

 * Starting nginx nginx
   ...done.
==> /scif/logs/gunicorn-access.log <==

==> /scif/logs/gunicorn.log <==
[2017-11-11 16:28:42 +0000] [1] [INFO] Starting gunicorn 19.7.1
[2017-11-11 16:28:42 +0000] [1] [INFO] Listening at: http://0.0.0.0:5000 (1)
[2017-11-11 16:28:42 +0000] [1] [INFO] Using worker: sync
[2017-11-11 16:28:42 +0000] [35] [INFO] Booting worker with pid: 35
The above is telling us that the webserver is writing output to logs in /scif/logs
in the image, and we are viewing the main log. The port 5000 that is running the Flask
server is being served via gunicorn at localhost.
This means that if you open your browser to localhost (http://127.0.0.1) you will
see your experiment interface! When you select an experiment, the general url will look
something like http://127.0.0.1/experiments/tower-of-london. Now try hitting “Control+C” in the terminal where the server is running. You will see it exit. Refresh the browser, and see that the experiment is gone too. What we actually want to do is run the server in detached mode. After you’ve Control+C, try adding a -d to the original command. This means detached.
docker run -d -p 80:80 vanessa/experiment start
2c503ddf6a7a0f2a629fa2e55276e220246320291c14f6393a33ef54ab5d512a
The long identifier spit out is the container identifier, and we will reference it by the first 12 digits.
Try running docker ps to list your active containers - you will see it is the first one! And look at the
CONTAINER_ID:
$ docker ps
CONTAINER ID        IMAGE                COMMAND                  CREATED             STATUS              PORTS                          NAMES
2c503ddf6a7a        vanessa/experiment   "/bin/bash /starts..."   10 minutes ago      Up 10 minutes       0.0.0.0:80->80/tcp, 5000/tcp   zealous_raman
You can also use the name (in this example zealous_raman) to reference the container, or give it your own name with --name when you run it. For more details on how to customize your container, including the database and study id, see the usage docs.
Shell into your Container
It’s important that you know how to shell into your container for interactive debugging, and
general knowledge about Docker. First, open up a new terminal. As we did above, we used docker ps
to see our running container:
$ docker ps
CONTAINER ID        IMAGE                COMMAND                  CREATED             STATUS              PORTS                          NAMES
2c503ddf6a7a        vanessa/experiment   "/bin/bash /starts..."   10 minutes ago      Up 10 minutes       0.0.0.0:80->80/tcp, 5000/tcp   zealous_raman
The cool part is that it shows us what we already know - port 80 in the container is mapped to 80 on our local machine, and the application served at port 5000 is exposed. And it has QUITE a fantastic name (zealous_raman) because we didn’t specify one with a --name argument.
To shell and work interactively in the image:
docker exec -it 2c503ddf6a7a bash
root@2c503ddf6a7a:/scif/apps#
We shell into the /scif/apps directory - we are inside the container, with our installed experiments! Take a look!
$ ls
   tower-of-london
Here are the logs we were looking at:
$ ls /scif/logs
gunicorn-access.log  gunicorn.log  expfactory.log
Importantly, our data is to be saved under /scif/data, which we would map to our local machine (so the generated data doesn’t disappear when we remove the container).
ls /scif/data/
expfactory
Right now the folder is empty because we haven’t had anyone do the experiment yet. Try navigating back to (http://127.0.0.1) in
your browser, and completing a round of the task. Here I am from outside the container. Remember I’ve mapped /tmp/my-experiment/data to /scif/data in the image. My study id is expfactory and the first participant has just finished:
$ ls data/expfactory/00000/
test-task-results.json
Stopping your Container
For the first example that we did without detached (-d) if you pressed Control+C for the terminal with the container started, you will kill the process and stop the container. This would happen regardless if you were shelled in another container, because the start script exits. However, now that we have it running in this detached state, we need to stop it using the docker daemon, and don’t forget to remove it:
docker stop 2c503ddf6a7a
docker rm 2c503ddf6a7a
You can also use the name.
Adding Experiments
While we encourage you to re-generate the file with the quay.io/vanessa/expfactory-builder so generation of your
container is reproducible, it’s possible to install experiments into your container after it’s generated. You
should only do this for development, as changes that you make to your container that are not recorded in the Dockerfile
are not reproducible. Let’s say that we have an experiment container that has one task, tower-of-london, and we want to install
test-task to it.
First let’s create our container fresh, find the name, and shell into it:
$ docker run -p 80:80 vanessa/experiment start

# What's the name?
$ docker ps
9e256e1b1473        vanessa/experiment   "/bin/bash /starts..."   3 seconds ago       Up 2 seconds        0.0.0.0:80->80/tcp, 5000/tcp   vigorous_lovelace

# Let's shell inside!
docker exec -it 9e256e1b1473 bash
We can see the one experiment installed, it was the one in our Dockerfile:
$ docker exec -it vigorous_lovelace bash
root@9e256e1b1473:/scif/apps# ls
tower-of-london
Now let’s install a new one! Remember we need to be in /scif/apps to install the experiment there. What was the Github
url again? Let’s ask…
expfactory list
Expfactory Version: 3.0
Experiments
1  adaptive-n-back	https://github.com/expfactory-experiments/adaptive-n-back
2  alcohol-drugs-survey	https://github.com/expfactory-experiments/alcohol-drugs-survey
3  breath-counting-task	https://github.com/expfactory-experiments/breath-counting-task
4  digit-span	https://github.com/expfactory-experiments/digit-span
5  dospert-eb-survey	https://github.com/expfactory-experiments/dospert-eb-survey
6  dospert-rp-survey	https://github.com/expfactory-experiments/dospert-rp-survey
7  dospert-rt-survey	https://github.com/expfactory-experiments/dospert-rt-survey
8  spatial-span	https://github.com/expfactory-experiments/spatial-span
9  test-task	https://github.com/expfactory-experiments/test-task
10 tower-of-london	https://github.com/expfactory-experiments/tower-of-london
Ah yes, let’s install test-task:
$ expfactory install https://github.com/expfactory-experiments/test-task
Expfactory Version: 3.0
Cloning into '/tmp/tmp5xn6oc4v/test-task'...
remote: Counting objects: 62, done.
remote: Compressing objects: 100% (49/49), done.
remote: Total 62 (delta 20), reused 55 (delta 13), pack-reused 0
Unpacking objects: 100% (62/62), done.
Checking connectivity... done.
LOG Installing test-task to /scif/apps/test-task
LOG Preparing experiment routes...
Now you are probably navigating to your web interface at (http://127.0.0.1) and confused that the new experiment isn’t there. The easiest way to restart all the moving pieces is to (from outside the container) restart it. Let’s exit, and do that.
$ exit
docker restart 9e256e1b1473
You then should have the new experiment installed in the container! Remember, you would want to go back and (properly) produce this:
docker run -v $PWD:/data quay.io/vanessa/expfactory-builder build digit-span test-task
If you have any questions about the above, or want more detail, please get in touch as I am looking to develop this.
Now that you are comfortable generating your container, check out how to customize it.
Custom Configuration
Note that these pages describe variables to customize the experiment container. See participant variables for customizing experiments.
You have probably just reviewed the basics of generation of a container and now are ready to customize it. For example, if you want more specificity to configure your container, you might want to customize the database or experiment variables. There are two kinds of customization, the customization that happens before you build the container (for example, the experiments you choose to install, period, and any defaults you want set for running them) and the customization that happens at runtime (meaning defining the database type when you start the container).
If you change the defaults, this means that any users that run your container (without specifying these variables) will get these as default. If you want your container to be most usable by others, we recommend that you don’t do this, and keep the defaults as the most flexible types - a flat file system database and general study id (expfactory).
If you leave these defaults, you (and the future users of your container) can then easily customize these variables when the container is started in the future. The risk of setting a default database like sql or postgres is that a user that doesn’t know some credential needs to be defined won’t be able to use the container.
The choice is up to you! For settings defaults at build time, see the next section default variables. For setting at runtime, see the next page for starting your container.
Default Variables
When you run a build with quay.io/vanessa/expfactory-builder image, there are other command line options available pertaining to the database and study id. Try running docker run quay.io/vanessa/expfactory-builder build --help to see usage. If you customize these variables, the container recipe generated will follow suit.
database
We recommend that you generate your container using the default “filesystem” database, and customize the database at runtime. A filesystem database is flat files, meaning that results are written to a mapped folder on the local machine, and each participant has their own results folder. This option is provided as many labs are accustomed to providing a battery locally, and want to save output directly to the filesystem without having any expertise with setting up a database. This argument doesn’t need to be specified, and would coincide with:
docker run -v /tmp/my-experiment:/data \
              quay.io/vanessa/expfactory-builder \
              build --database filesystem \
                      tower-of-london
Your other options are sqlite, mysql, and postgres all of which we recommend you specify when you start the image.
randomize
By default, experiments will be selected in random order, and it’s recommended to keep this. The other option will use the ordering of experiments as you’ve selected them. If you want a manually set order, then after you use the expfactory-builder, edit your Dockerfile by adding the following environment variable:
ENV EXPFACTORY_RANDOM true
This variable can be easily changed at runtime via a checkbox, so it’s not hugely important to set here.
studyid
The Experiment Factory will generate a new unique ID for each participant with some study idenitifier prefix. The default is expfactory, meaning that my participants will be given identifiers expfactory/0 through expfactory/n, and for a filesystem database, it will produce output files according to that schema:
 /scif/data/
      expfactory/
           00000/
            tower-of-london-result.json
To ask for a different study id:
docker run -v /tmp/my-experiment:/data \
              quay.io/vanessa/expfactory-builder \
              build --studyid dns \
                      tower-of-london
Again, we recommend that you leave this as general (or the default) and specify the study identifier at runtime. If you want to preserve a container to be integrated into an analysis exactly as is, then you would want to specify it at build.
output
You actually don’t want to edit the recipe output file, since this happens inside the container (and you map a folder of your choice to it.) Note that it is a variable, however, if you need to use expfactory natively and want to specify a different location.
Environment Variables
Many of the custom variables, along with runtime variables that you want to set as defaults, can be specified in the environment. This typically means building your experiment container with the variable defined (e.g., in the Dockerfile, usually like ENV EXPFACTORY_STUDY_ID expfactory). Here we will provide a tabular overview of these variables. The first set are pertinent to runtime variables. Setting runtime variables in the environment will make them defaults for your container, but they can be overriden by the user at runtime.
Runtime Variable Table
| Variable | Default | Command Line Option | Definition |
|---|---|---|---|
| EXPFACTORY_STUDY_ID | expfactory | --studyid |
the study identifier is used (for a flat filesystem database) as the base folder name |
| EXFACTORY_RANDOM | true | --randomize or --no-randomize |
present the experiments in random order |
| EXPFACTORY_DATABASE | filesystem | --database |
the database to use by default (can be overriden by user at runtime) |
| EXPFACTORY_HEADLESS | false | --headless |
hide the experiment selection portal and require token ids for entry |
| EXPFACTORY_EXPERIMENTS | undefined | --experiments |
A list of experiments to subset the portal to on a session start. Default is undefined, meaning all experiments in the container are deployed. |
| EXPFACTORY_RUNTIME_VARS | undefined | --vars |
a file with variables to pass to experiments with POST |
| EXPFACTORY_RUNTIME_DELIM | \t (TAB) |
--delim |
the delimiter to separate columns in the variables file |
Install Variables
The next set are relevant for installation.
| Variable | Default | Command Line Option | Definition |
|---|---|---|---|
| EXPFACTORY_REGISTRY_BASE | expfactory.github.io | NA | the registry base to install from |
| EXPFACTORY_LIBRARY | EXPFACTORY_REGISTR_BASE/experiments/library.json |
NA | the library json to install from |
| EXPFACTORY_BRANCH | master | NA | when building, the branch from expfactory to install from. Useful for development |
| EXPFACTORY_DATA | /scif/data | NA | the base for data, defaults to Scientific Filesystem $SCIF_DATA |
| EXPFACTORY_BASE | /scif/apps | NA | the base for experiments, defaults to Scientific Filesystem $SCIF_APPS |
| EXPFACTORY_LOGS | /scif/logs | NA | folder to store expfactory.log in |
| EXPFACTORY_COLORIZE | true | NA | print colored debugging to the screen |
| EXPFACTORY_SERVER | localhost | NA | the server address, usually localhost is appropriate |
Note that bases for expfactory were initially provided on Docker Hub and have moved to Quay.io. Dockerfiles in the repository that use the expfactory-builder are also updated. If you need a previous version, please see the tags on the original Docker Hub.
Expfactory wants Your Feedback!
The customization process is very important, because it will mean allowing you to select variable stimuli, lengths, or anything to make a likely general experiment specific to your use case. To help with this, please let us know your thoughts.
Usage
If you’ve just finished generating your experiments container (whether a custom build or pull of an already existing container) then you are ready to use it! These sections will discuss runtime variables, along with settings like experiment order and database type.
Summary of Variables
Below, we will summarize the variables that can be set at runtime:
| Variable | Description | Default |
|---|---|---|
| database | the database to store response data | filesystem |
| headless | require pre-generated tokens for headless use | flag |
| randomize | present the experiments in random order | flag |
| no-randomize | present the experiments in random order | flag |
| experiments | comma separated list of experiments to expose | [] |
| studyid | set the studyid at runtime | expfactory |
If you have variables to set on a per-subject basis, then you can also define these with a custom variables file. See participant variables below to undestand this.
Start the Container
The first thing you should do is start the container. The variables listed above can be set when you do this.
Save Data to the Host
It’s most likely the case that your container’s default is to save data to the file system, and use a study id of expfactory. This coincides to running with no extra arguments, but perhaps mapping the data folder:
docker run -v /tmp/my-experiment/data/:/scif/data \
           -d -p 80:80 \
           expfactory/experiments start
Custom Databases
Here is how you would specify a different studyid. The study id is only used for a folder name (in the case of a fileystem save) or an sqlite database name (for sqlite3 database):
docker run -v /tmp/my-experiment/data/:/scif/data \
           -d -p 80:80 \
           expfactory/experiments  --studyid dns start
Here is how to specify a different database, like sqlite
docker run -v /tmp/my-experiment/data/:/scif/data \
           -d -p 80:80 \
           expfactory/experiments  --database sqlite start
Custom Experiment Set
Here is how to limit the experiments exposed in the portal. For example, you may have 30 installed in the container, but only want to reveal 3 for a session:
docker run -v /tmp/my-experiment/data/:/scif/data \
           -d -p 80:80 \
           expfactory/experiments  --experiments test-test,tower-of-london start
Participant Variables
When you start your container, you will have the option to provide a comma separated file (csv) of subject identifiers and experiment variables. These variables will simply be passed to the relevant experiments that are specified in the file given that a particular participant token is running. The variables are not rendered or otherwise checked in any way before being passed to the experiment (spaces and capitalization matters, and the experiment is required to do any extra parsing needed in the Javascript). The server does not do any kind of custom parsing or checks for them. Let’s look at an example file to better understand this. The format of the file should be flat and tab delimited (default) with fields for an experiment id (exp_id), variable name and values (var_name, var_values) and then a token assigned to each:
exp_id,var_name,var_value,token
test-parse-url,globalname,globalvalue,*
test-parse-url,color,red,123
test-parse-url,color,blue,456
test-parse-url,color,pink,789
test-parse-url,words,at the thing,123
test-parse-url,words,omg tacos,456
test-parse-url,words,pancakes,789
In the example above, the participants defined have tokens 123 and 456. For any other participants, we have defined a global variable globalname to be globalvalue. The first row in the file is non negoatiable - it must have four fields, in that order,
and name. The fields are the following:
- exp_id The Experiment Factory identifier that identifies the experiment
- var_name The variable name to pass into the url
- var_value the variable_value to pass
- token the subject token to pass for. If a particular combination of exp_id and token is seen twice, a warning will be issued and the later defined taken preference. If you set token to “*” it will be treated as a global variable, and set for all subject ids (also defined in the file) that do not have a previously defined value for the variable in question.
The variables will be passed to the experiment test-parse-url via the URL, and it’s up to the experiment to parse them with JavaScript. For example, if I am participant 789 and I start the test-parse-url task, my variables will be passed in the format (shown for one and more than one variable):
<base-url>/experiments/<exp_id>?<var_name>=<var_value>
<base-url>/experiments/<exp_id>?<var_name1>=<var_value1>&<var_name2>=<var_value2>
which corresponds to this for the file above:
http://127.0.0.1/experiments/test-parse-url?globalname=globalvalue&color=pink&words=pancakes
The parameters are simply passed to the experiment, and the experiment is expected to parse them appropriately. Since the data file is loaded at start of the container and you would need to generate users before using them, you will want to:
- start the container in detached mode
-dand then generate users - list the users or otherwise get the identifiers that you’ve created
- create the variables file with the user ids specified
- stop the container, making sure to restart with the same database mapped.
A complete example of this is provided in the test-parse-url repository and the commands are briefly summarized below.
# Pull the example container with the url experiment (or create your own!)
docker pull vanessa/test-parse-url:v3.1 .

# Start it in detached mode, named test-parse-url, filesystem database is mapped to the host
docker run --name test-parse-url -d -v $PWD:/scif/data -p 80:80 vanessa/test-parse-url start

# Verify no participants
docker exec test-parse-url expfactory users --list

# Create three users, and list identifiers to write into file
docker exec test-parse-url expfactory users --new 3
exec d8c612e0dfa2 expfactory users --list
/scif/data/expfactory/017305e8-7eba-4d43-bc81-e95f5ceab0a8	017305e8-7eba-4d43-bc81-e95f5ceab0a8[active]
/scif/data/expfactory/275ae6ea-5d33-499e-a3db-2bbcc4881ff4	275ae6ea-5d33-499e-a3db-2bbcc4881ff4[active]
/scif/data/expfactory/a737a811-1bcc-449c-b0b0-9acded60bbd9	a737a811-1bcc-449c-b0b0-9acded60bbd9[active]
Here is the new data variables file:
exp_id,var_name,var_value,token
test-parse-url,globalname,globalvalue,*
test-parse-url,color,red,017305e8-7eba-4d43-bc81-e95f5ceab0a8
test-parse-url,color,blue,275ae6ea-5d33-499e-a3db-2bbcc4881ff4
test-parse-url,words,at the thing,017305e8-7eba-4d43-bc81-e95f5ceab0a8
test-parse-url,words,omg tacos,275ae6ea-5d33-499e-a3db-2bbcc4881ff4
Stop the container and verify the filesystem database persists on the host.
$  ls expfactory/
017305e8-7eba-4d43-bc81-e95f5ceab0a8  275ae6ea-5d33-499e-a3db-2bbcc4881ff4  a737a811-1bcc-449c-b0b0-9acded60bbd9
Run the container again, this time specifying the variables file with --vars. Since we are using a filesystem database we don’t need to start
the exact same container, but you could if you wanted to. You can also change the delimiter with --delim.
docker run -d -v $PWD:/scif/data -p 80:80 vanessa/test-parse-url --vars /scif/data/variables.csv --headless start
Note that you can also export these settings in the environment of your container as EXPFACTORY_RUNTIME_VARS and EXPFACTORY_RUNTIME_DELIM. If you have experiment variables that are required or defaults, you could thus build the container and include the file inside,
and export the environment variable in the container to the file. Make sure to open the experiment in a new browser tab, in case you have any previous sessions (data in the browser cache). When we enter one of our participant identifiers, we see the variables passed on!

For a complete tutorial of the above, see the test-parse-url repository.
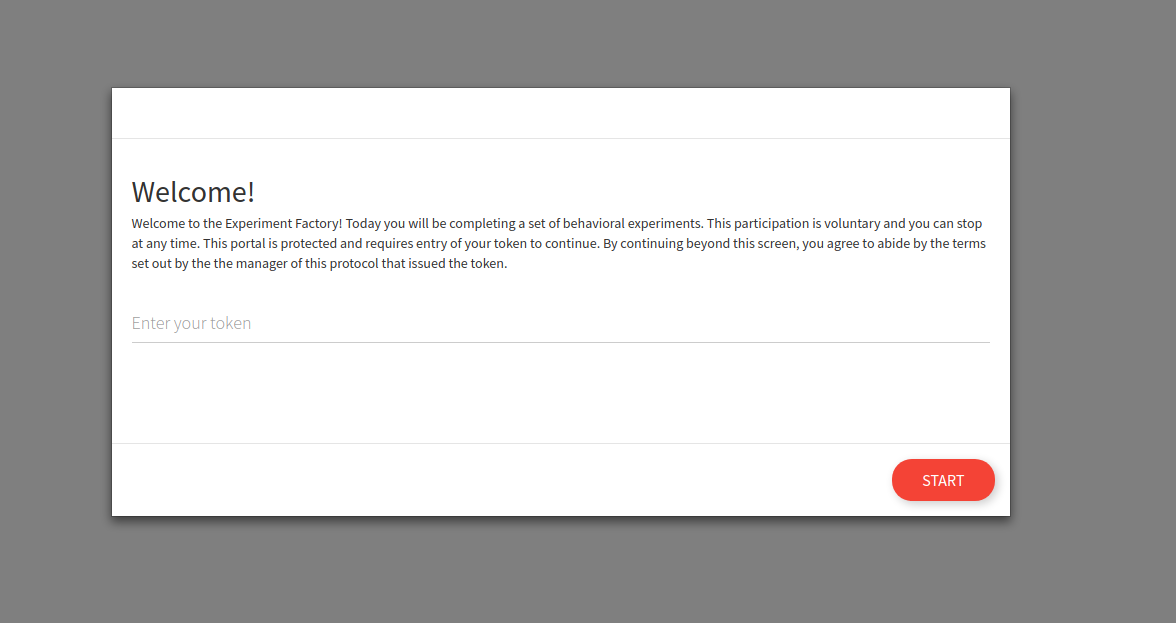
Start a Headless Experiment Container
“Headless” refers to the idea that you going to be running your experiment with remote participants, and you will need to send them to a different portal that has them login first. In order to do this, you need to start the container with the --headless flag, and then issue a command to pre-generate these users.
First we can start the container (notice that we are giving it a name to easily reference it by) with --headless mode.
docker run -p 80:80 -d --name experiments -v /tmp/data:/scif/data <container> --headless start
4f6826329e9e366c4d2fb56d64956f599861d1f0439d39d7bcacece3e88c7473
If we go to the portal at 127.0.0.1 we will see a different entrypoint, one that requires a token.
You can also start and specify to not randomize, and present experiments in a particular order:
docker run -p 80:80 -d --name experiments -v /tmp/data:/scif/data <container> \
                    --headless --no-randomize \
                    --experiments test-task,tower-of-london start
If you ask for non random order without giving a list, you will present the experiments in the order listed on the filesystem. See pre-set-experiments for more information.
Generate tokens
A “token” is basically a subject id that is intended to be used once, and can be sent securely to your participants to access the experiments. The token can be refreshed, revoked, or active. You will need to generate them, and briefly it looks like this:
docker exec experiments expfactory users --help
docker exec experiments expfactory users --new 3
See managing users for complete details about generating, refreshing, and using tokens.
Use tokens
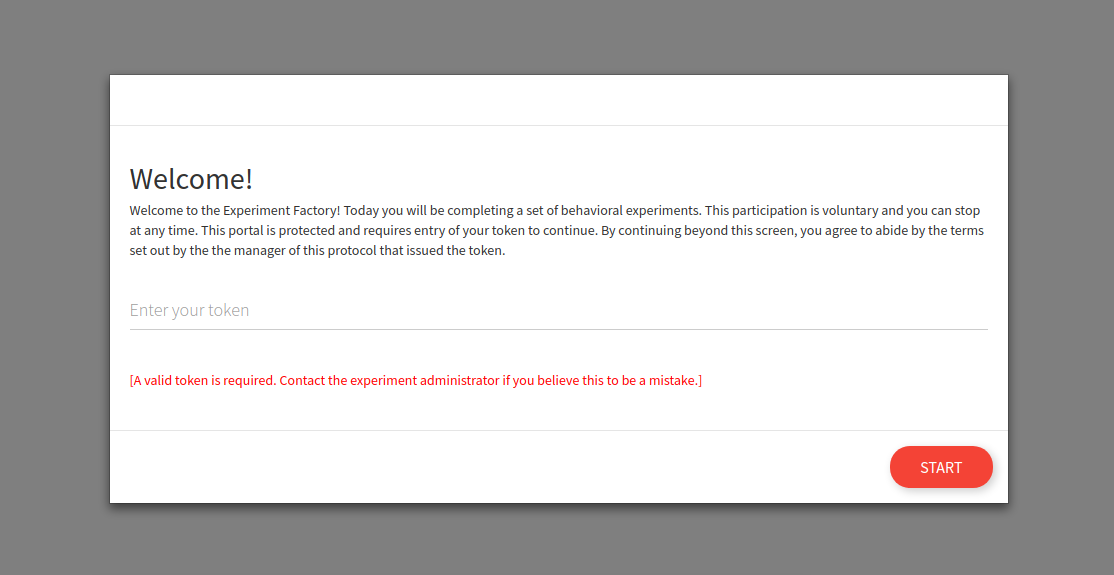
Once you generate tokens for your users (and remember that it’s up to you to maintain the linking of anonymous tokens to actual participants) the tokens can be entered into the web interface:

And of course it follows that if you enter a bad token, you cannot enter.
Once entry is given, the user can continue normally to complete the experiments in the protocol. If you want to provide the pre-generated URL to your participants to skip the login, you can have them navigate to this url
https://<your-server>/login?token=<token>
https://<your-server>/login?token=a34d4512-1841-4219-873d-2b9d1727a37a
Important since this is sending data with a GET request, this is not recommended to do without https.
Headless Finish
When the user finishes the protocol, the user will have the token revoked so an additional attempt to do the experiments will not work. You would need to generate a new session with token (the --new command above) or restart the participant to rewrite the previously generated data.
Pre-set Experiments
For a headless experiment, you don’t have the web interface to filter experiments in advance, or as for random (or not random) ordering. By default, not giving the --experiments argument will serve all experiments found installed in the container. If you want to limit to a smaller subset, do that with the experiments argument:
docker run -p 80:80 -d \
           --name experiments \
           -v /tmp/data:/scif/data <container> --experiments tower-of-london,test-task --headless start
and if you want the order typed to be maintained (and not random) add the --no-randomize flag.
docker run -p 80:80 -d \
           --name experiments \
           -v /tmp/data:/scif/data <container> --experiments tower-of-london,test-task --headless --no-randomize start
Container Logs
The expfactory tool in the container will let you view (or keep open) the experiment logs. You can do this by issuing a command to a running container:
$ docker exec angry_blackwell expfactory logs
New session [subid] expfactory/f57bd534-fa50-4af5-9114-d0fb769c5de4
[router] None --> bis11-survey for [subid] expfactory/f57bd534-fa50-4af5-9114-d0fb769c5de4 [username] You
Next experiment is bis11-survey
[router] bis11-survey --> bis11-survey for [subid] expfactory/f57bd534-fa50-4af5-9114-d0fb769c5de4 [username] You
Redirecting to /experiments/bis11-survey
Rendering experiments/experiment.html
Saving data for bis11-survey
Finishing bis11-survey
Finished bis11-survey, 0 remaining.
Expfactory Version: 3.0
if you want the window to remain open to watch, just add --tail
$ docker exec angry_blackwell expfactory logs --tail
You can equally shell into the contaniner and run expfactory logs directly.
User Management
This section will go into detail about generation, restart, revoke, and refresh of tokens.
- generation means creating a completely new entry in the database. Previous entries for a participant are irrelevant, you need to keep track of both.
- restart means that you are removing any
finishedstatus from a known participant token identifier. This means that the participant can navigate to the portal and retake the experiments, having the data saved under the previous identifier. Previous data is over-written. - revoke means that the participant is no longer allowed to participate. The token essentially becomes inactive.
- refresh means that a new token is issued. Be careful with refreshing a token, because you will need to keep track of the change in the subject token (the main identifier to the data).
Application Flow
The flow for a user session is the following:
Headless
- You generate an id and token for the user in advance
- The user starts and completes the experiments with the token associated with the id
- The token is revoked upon finish, meaning that the user cannot go back without you refreshing it.
Interactive
- The user is automatically issued an id upon starting the experiment, nothing is pre-generated
- When the user finishes,
_finishedis appended to the session folder, and so restarting the session will create a new folder. - If the user is revoked, the folder is appended with
_revoked - If the user finishes and returns to the portal, a new session (different data folder) is created.
If you are running an experiment in a lab and can expect the user to not return to the portal, the interactive option above is ok. However if you are serving the battery remotely, or if you want to better secure your databases, it’s recommend to run the experiment container headless. In this section, we will talk about user management that is relevant to a headless (without an interactive portal) start.
User Management Help
The main entrypoint for managing users is with expfactory users:
expfactory users --help
usage: expfactory users [-h] [--new NEW] [--list] [--revoke REVOKE]
                        [--refresh REFRESH] [--restart RESTART]
                        [--finish FINISH]
optional arguments:
  -h, --help         show this help message and exit
  --new NEW          generate new user tokens, recommended for headless
                     runtime.
  --list             list current tokens, for a headless install
  --revoke REVOKE    revoke token for a user id, ending the experiments
  --refresh REFRESH  refresh a token for a user
  --restart RESTART  restart a user, revoking and then refresing the token
  --finish FINISH    finish a user session by removing the token
Important For filesystem databases, the token coincides with the data folder, and is the user id. When you reference an id for a filesystem save, you reference the token (e.g., 41a451cc-7416-4fab-9247-59b1d65e33a2) however when you reference a relational database id, you reference the index. You should keep track of these corresponding values to keep track of your participants, and be careful when you refresh tokens as the filesystem folder (and thus participant id) will be renamed.
New Users
As shown previously, we can use exec to execute a command to the container to create new users:
docker exec experiments expfactory users --new 3
DATABASE	TOKEN
/scif/data/expfactory/41a451cc-7416-4fab-9247-59b1d65e33a2	41a451cc-7416-4fab-9247-59b1d65e33a2[active]
/scif/data/expfactory/6afabdd5-7d5e-48dc-a3b2-ade235d2e0a6	6afabdd5-7d5e-48dc-a3b2-ade235d2e0a6[active]
/scif/data/expfactory/3251fd0e-ba3e-4089-b01a-28dfa03f1fbd	3251fd0e-ba3e-4089-b01a-28dfa03f1fbd[active]
The result here will depend on the database type.
DATABASE: The above shows a filesystem save, so aDATABASErefers to the folder, and remember this is internal to the container, so you might have/scif/datamapped to a different folder on your host. A relational database would have theDATABASEcolumn correspond with the index.TOKEN: The token corresponds with the folder (for filesystem) or relational databasetokenvariable, and shown also is the participant status (e.g.,active).
You can copy paste this output from the terminal, or pipe into a file instead:
docker exec experiments expfactory users --new 3 >> participants.tsv
You can also issue these commands by shelling inside the container, which we will do for the remainder of the examples:
docker exec -it experiments bash
List Users
If you ever need to list the tokens you’ve generated, you can use the users --list command. Be careful that the environment variable EXPFACTORY_DATABASE is set to be the one that you intend. For example, a filesystem database setting will print all folders found in the mapped folder given this variable is set to filesystem. In the example below, we list users saved as folders on the filesystem:
 expfactory users --list
DATABASE	TOKEN
/scif/data/expfactory/41a451cc-7416-4fab-9247-59b1d65e33a2	41a451cc-7416-4fab-9247-59b1d65e33a2[active]
/scif/data/expfactory/6afabdd5-7d5e-48dc-a3b2-ade235d2e0a6	6afabdd5-7d5e-48dc-a3b2-ade235d2e0a6[active]
/scif/data/expfactory/3251fd0e-ba3e-4089-b01a-28dfa03f1fbd	3251fd0e-ba3e-4089-b01a-28dfa03f1fbd[active]
This would be equivalent to the following below. This is the suggested usage because a single container can be flexible to have multiple different kinds of databases:
expfactory users --list --database filesystem
If we were to list a relational database, we would see the database index in the DATABASE column instead:
expfactory users --list --database sqlite
DATABASE	TOKEN
6	a2d266f7-52a5-497b-9b85-1e98febef6dc[active]
7	a98e63c4-2ed1-4de4-a315-a9291502dd26[active]
8	f524e1cc-6841-4417-9529-80874cf30b74[active]
We generally recommend for you to specify the --database argument unless you are using the database defined to be the container default, determinde by EXPFACTORY_DATABASE in it’s build recipe (the Dockerfile). You can always check the default in a running image (foo) like this:
docker inspect foo | grep EXPFACTORY_DATABASE
                "EXPFACTORY_DATABASE=filesystem",
Important For relational databases, remember that the token is not the participant id, as it will be cleared when the participant finished the experiments. In the example above, we would care about matching the DATABASE id to the participant. For filesystem “databases” the token folder is considered the id. Thus, you should be careful with renaming or otherwise changing a partipant folder, because the token is the only association you have (and must keep a record of yourself) to a participant’s data.
Restart User
If a user finishes and you want to restart, you have two options. You can either issue a new identifier (this preserves previous data, and you will still need to keep track of both identifiers):
expfactory users --new 1
DATABASE	TOKEN
/scif/data/expfactory/1753bfb5-a230-472c-aa04-ecdc118c1922	1753bfb5-a230-472c-aa04-ecdc118c1922[active]
or you can restart the user, meaning that any status of finished or revoked is cleared, and the participant can again write (or over-write) data to his or her folder. You would need to restart a user if you intend to refresh a token. Here we show the folder with list before and after a restart:
$ expfactory users --list
/scif/data/expfactory/04a144da-97f5-4734-b5ea-1658aa2170ce_finished	04a144da-97f5-4734-b5ea-1658aa2170ce[finished]

$ expfactory users --restart 04a144da-97f5-4734-b5ea-1658aa2170ce
[restarting] 04a144da-97f5-4734-b5ea-1658aa2170ce --> /scif/data/expfactory/04a144da-97f5-4734-b5ea-1658aa2170ce

$ expfactory users --list
/scif/data/expfactory/04a144da-97f5-4734-b5ea-1658aa2170ce	04a144da-97f5-4734-b5ea-1658aa2170ce[active]
You can also change your mind and put the user back in finished status:
$ expfactory users --finish 04a144da-97f5-4734-b5ea-1658aa2170ce
[finishing] 04a144da-97f5-4734-b5ea-1658aa2170ce --> /scif/data/expfactory/04a144da-97f5-4734-b5ea-1658aa2170ce_finished
or revoke the token entirely, which is akin to a finish, but implies a different status.
$ expfactory users --revoke 04a144da-97f5-4734-b5ea-1658aa2170ce
[revoking] 04a144da-97f5-4734-b5ea-1658aa2170ce --> /scif/data/expfactory/04a144da-97f5-4734-b5ea-1658aa2170ce_revoked

$ expfactory users --list
/scif/data/expfactory/04a144da-97f5-4734-b5ea-1658aa2170ce_revoked	04a144da-97f5-4734-b5ea-1658aa2170ce[revoked]
Refresh User Token
A refresh means issuing a completely new token, and this is only possible for status [active]. You should be careful with this because the folder is renamed (for filesystem) commands. If you have a finished or revoked folder and want to refresh a user token, you need to restart first. Here is what it looks like to refresh an active user token:
expfactory users --refresh 1320a84f-2e70-456d-91dc-083d36c68e17
[refreshing] 1320a84f-2e70-456d-91dc-083d36c68e17 --> /scif/data/expfactory/fecad5cd-b044-4b1a-8fd1-37aafdbf8ed7
A completely new identifier is issued, and at this point you would need to update your participant logs with this change.
Important For the examples above, since we are using a filesystems database, the participant id is the token. For relational databases, the participant id is the database index.
Having these status and commands ensures that a participant, under headless mode, cannot go back and retake the experiments unless you explicitly allow them, either by way of a new token or an updated one. If a user tried to complete the experiment again after finish or revoke, a message is shown that a valid token is required. If the user reads these documents and adds a _finished extension, it’s still denied.
Saving Data
Whether you choose a headless or interactive start, in both cases you can choose how your data is saved. The subtle difference for each saving method that result when you choose headless or interactive will be discussed below.
filesystem
Saving to the filesytem is the default (what you get when you don’t specify a particular database) and means saving to a folder called /scif/data in the Docker image. If you are saving data to the filesystem (filesystem database), given that you’ve mounted the container data folder /scif/data to the host, this means that the data will be found on the host in that location. In the example below, we have mounted /tmp/data to /scif/data in the container, and we are running interactive experiments (meaning without pre-generated tokens for login):
$ tree /tmp/data/expfactory/xxxx-xxxx-xxxx/

    /tmp/data/expfactory/xxxx-xxxx-xxxx/
       └── tower-of-london-results.json

0 directories, 1 file
If we had changed our studyid to something else (e.g., dns), we might see:
$ tree /tmp/data/dns/xxxx-xxxx-xxxx/

    /tmp/data/dns/xxxx-xxxx-xxxx/
       └── tower-of-london-results.json

0 directories, 1 file
Participant folders are created under the studyid folder. If you stop the container and had mounted a volume to the host, the data will persist on the host. If you didn’t mount a volume, then you will not see the data on the host.
Now we will talk about interaction with the data.
How do I read it?
For detailed information about how to read json strings (whether from file or database) see working with JSON. For a filesystem save, the data is saved to a json object, regardless of the string output produced by the experiment. This means that you can load the data as json, and then look at the data key to find the result saved by the particular experiment. Typically you will find another string saved as json, but it could be the case that some experiments do this differently.
sqlite
An sqlite database can be used instead of a flat filesytem. This will produce one file that you can move around and read with any standard scientific software (python, R) with functions to talk to sqlite databases. If you want to start your container and use sqlite3, then specify:
docker run -p 80:80 expfactory/experiments \
           --database sqlite \
           start
If you just specify sqlite the file will save to a default at /scif/data/<studyid>.db You can also specify a custom database uri that starts with sqlite, like sqlite:////tmp/database.db that will be generated in the container (and you can optionally map to the host). For example, here is my sqlite3 database under /scif/data, from within the container:
ls /scif/data
    expfactory.db
How do I read it?
You can generally use any scientific programming software that has libraries for interacting with sqlite3 databases. My preference is for the sqlite3 library, and we might read the file like this (in python):
import sqlite3
conn = sqlite3.connect('/scif/data/expfactory.db')

cur = conn.cursor()
cur.execute("SELECT * FROM result")
results = cur.fetchall()

for row in results:
    print(row)
Each result row includes the table row id, the date, result content, and participant id.
>>> row[0]  # table result row index
1

>>> row[1]  # date
'2017-11-18 17:26:30'

>>> row[2]  # data from experiment, json.loads needed
>>> json.loads(row[2])
[{
   'timing_post_trial': 100,
   'exp_id': 'test-task',
   'block_duration': 2000,
   'trial_index': 0,
    ...

   'key_press': 13,
   'trial_index': 5,
   'rt': 1083,
   'full_screen': True,
   'block_duration': 1083,
   'time_elapsed': 14579
}]

>>> res[3] # experiment id (exp_id)
'test-task'

>>> res[4] # participant id
7
Since the Participant table doesn’t hold anything beyond the participant id, you shouldn’t need to query it. More detail is added for loading json in (see loading results) below.
mysql
For labs that wish to deploy the container on a server, you are encouraged to use a more substantial database, such as a traditional relational database like MySQL or Postgres. In all of these cases, you need to specify the full database url. For mysql, we also specify using a particular driver called pymysql. For example:
# mysql
docker run -p 80:80 expfactory/experiments \
           --database  mysql+pymysql://username:password@host/dbname", \
           start

docker run -p 80:80 vanessa/experiment \
           --database "mysql+pymysql://root:expfactory@172.17.0.3/db" \
           start
As an example, let’s use a throw away Docker mysql container. We will start it first. You should either use an external database, or a more substantial deployment like Docker=compose, etc.
docker run --detach --name=expfactory-mysql --env="MYSQL_ROOT_PASSWORD=expfactory" \
                                            --env="MYSQL_DATABASE=db" \
                                            --env="MYSQL_USER=expfactory" \
                                            --env="MYSQL_PASSWORD=expfactory" \
                                             mysql
Note that if you ran the container -with --publish 6603:3306 it would be mapped to your host (localhost) making it accessible to the outside world. You should be able to see it with docker ps:
$ docker ps
CONTAINER ID        IMAGE                COMMAND                  CREATED             STATUS              PORTS                          NAMES
47f9d56f1b3f        mysql                "docker-entrypoint..."   2 minutes ago       Up 2 minutes        3306/tcp                       expfactory-mysql
and inspect it to get the IPAddress
$ docker inspect expfactory-mysql | grep '"IPAddress"'
            "IPAddress": "172.17.0.2",
This is good! We now have the address to give to our Expfactory container.
docker run -p 80:80 expfactory/experiments \
           --database "mysql+pymysql://expfactory:expfactory@172.17.0.2/db" \
           start
In the example above, the username is expfactory, the password is expfactory, the host is 172.17.0.2 that we inspected above, and the database name is db. You can now open the browser to do an experiment, and then (again) use python to inspect results. I like pymysql because it seems to work in Python 3:
import pymysql
conn = pymysql.connect(host='172.17.0.2',
                       user='expfactory',
                       password='expfactory',
                       db='db',
                       charset='utf8mb4',
                       cursorclass=pymysql.cursors.DictCursor)

try:
    with conn.cursor() as cursor:
        cursor.execute("SELECT * FROM result")
        result = cursor.fetchone()
        print(result)
finally:
    conn.close()
and the above will print a nice dump of the test task that we just took!
{'date': datetime.datetime(2017, 11, 19, 16, 28, 50), 'exp_id': 'test-task', 'data': '[{"rt":821,"stimulus":"<div class = \\"shapebox\\"><div id = \\"cross\\"></div></div>","key_press":32,"possible_responses":[32],"stim_duration":2000,"block_duration":2000,"timing_post_trial":100,"trial_id":"test","trial_type":"poldrack-single-stim","trial_index":0,"time_elapsed":2004,"internal_node_id":"0.0-0.0","addingOnTrial":"added!","exp_id":"test-task","full_screen":true,"focus_shifts":0},{"rt":400,"stimulus":"<div class = \\"shapebox\\"><div id = \\"cross\\"></div></div>","key_press":32,"possible_responses":[32],"stim_duration":2000,"block_duration":2000,"timing_post_trial":100,"trial_id":"test","trial_type":"poldrack-single-stim","trial_index":1,"time_elapsed":4108,"internal_node_id":"0.0-1.0","addingOnTrial":"added!","exp_id":"test-task","full_screen":false,"focus_shifts":0},{"rt":324,"stimulus":"<div class = \\"shapebox\\"><div id = \\"cross\\"></div></div>","key_press":32,"possible_responses":[32],"stim_duration":2000,"block_duration":2000,"timing_post_trial":100,"trial_id":"test","trial_type":"poldrack-single-stim","trial_index":2,"time_elapsed":6209,"internal_node_id":"0.0-2.0","addingOnTrial":"added!","exp_id":"test-task","full_screen":false,"focus_shifts":0,"added_Data?":"success!"},{"trial_type":"call-function","trial_index":3,"time_elapsed":6310,"internal_node_id":"0.0-3.0","exp_id":"test-task","full_screen":false,"focus_shifts":0},{"rt":4491,"responses":"{\\"Q0\\":\\"jhjkh\\",\\"Q1\\":\\"\\"}","trial_id":"post task questions","trial_type":"survey-text","trial_index":4,"time_elapsed":10805,"internal_node_id":"0.0-5.0","exp_id":"test-task","full_screen":false,"focus_shifts":0},{"text":"<div class = centerbox><p class = center-block-text>Thanks for completing this task!</p><p class = center-block-text>Press <strong>enter</strong> to continue.</p></div>","rt":1413,"key_press":13,"block_duration":1413,"timing_post_trial":0,"trial_id":"end","exp_id":"test-task","trial_type":"poldrack-text","trial_index":5,"time_elapsed":13219,"internal_node_id":"0.0-6.0","credit_var":true,"performance_var":600,"full_screen":false,"focus_shifts":0}]', 'id': 1, 'participant_id': 1}
Don’t forget to stop your image (control+c if it’s hanging, or docker stop <containerid> if detached, and then remove the mysql container after that.
docker stop expfactory-mysql
docker rm expfactory-mysql
Note that this is only an example, we recommend that you get proper hosting (for example, Stanford provides this for users) or use a standard cloud service (AWS or Google Cloud) to do the same. You generally want to make sure your database has sufficient levels of permissions to be sure, encryption if necessary, and redundancy (backup). Keep in mind that some experiments might give participants open boxes to type, meaning you should be careful about PHI, etc. This is also another reason that a much simpler, local save to the file system isn’t such a crazy idea. Always discuss your experiment strategy with your IRB before proceeding!
postgres
We can do similar to the above, but use postgres instead. First we will start a second container:
docker run --name expfactory-postgres --env POSTGRES_PASSWORD=expfactory \
                                      --env POSTGRES_USER=expfactory  \
                                      --env POSTGRES_DB=db \
                                      -d postgres
Ensure that our container is running with docker ps
docker ps
CONTAINER ID        IMAGE               COMMAND                  CREATED             STATUS              PORTS               NAMES
bb748a75bd91        postgres            "docker-entrypoint..."   2 seconds ago       Up 1 second         5432/tcp            expfactory-postgres
and of course get the IPAddress
$ docker inspect expfactory-postgres | grep '"IPAddress"'
            "IPAddress": "172.17.0.2",
Now we can again form our complete database url to give to the experiment factory container to connect to:
# postgres
docker run -p 80:80 vanessa/experiment \
           --database "postgres://expfactory:expfactory@172.17.0.2/db" \
           start
If you leave it hanging in the screen (note no -d for detached above) you will see this before the gunicorn log:
Database set as postgres://expfactory:expfactory@172.17.0.2/db
Now let’s again do the test task, and start up python on our local machine to see if we have results!
import psycopg2
db = "host='172.17.0.2' dbname='db' user='expfactory' password='expfactory'"
conn = psycopg2.connect(db)
cursor = conn.cursor()
cursor.execute("SELECT * FROM result")
result = cursor.fetchall()
And here is our row, a list with 5 indices.
[(1,
  datetime.datetime(2017, 11, 19, 16, 48, 51, 957224),
  '[{"rt":1294,"stimulus":"<div class = \\"shapebox\\"><div id = \\"cross\\"></div></div>","key_press":32,"possible_responses":[32],"stim_duration":2000,"block_duration":2000,"timing_post_trial":100,"trial_id":"test","trial_type":"poldrack-single-stim","trial_index":0,"time_elapsed":2005,"internal_node_id":"0.0-0.0","addingOnTrial":"added!","exp_id":"test-task","full_screen":false,"focus_shifts":0},{"rt":163,"stimulus":"<div class = \\"shapebox\\"><div id = \\"cross\\"></div></div>","key_press":32,"possible_responses":[32],"stim_duration":2000,"block_duration":2000,"timing_post_trial":100,"trial_id":"test","trial_type":"poldrack-single-stim","trial_index":1,"time_elapsed":4107,"internal_node_id":"0.0-1.0","addingOnTrial":"added!","exp_id":"test-task","full_screen":false,"focus_shifts":0},{"rt":324,"stimulus":"<div class = \\"shapebox\\"><div id = \\"cross\\"></div></div>","key_press":32,"possible_responses":[32],"stim_duration":2000,"block_duration":2000,"timing_post_trial":100,"trial_id":"test","trial_type":"poldrack-single-stim","trial_index":2,"time_elapsed":6208,"internal_node_id":"0.0-2.0","addingOnTrial":"added!","exp_id":"test-task","full_screen":false,"focus_shifts":0,"added_Data?":"success!"},{"trial_type":"call-function","trial_index":3,"time_elapsed":6309,"internal_node_id":"0.0-3.0","exp_id":"test-task","full_screen":false,"focus_shifts":0},{"rt":6904,"responses":"{\\"Q0\\":\\"bloop\\",\\"Q1\\":\\"debloop\\"}","trial_id":"post task questions","trial_type":"survey-text","trial_index":4,"time_elapsed":13217,"internal_node_id":"0.0-5.0","exp_id":"test-task","full_screen":false,"focus_shifts":0},{"text":"<div class = centerbox><p class = center-block-text>Thanks for completing this task!</p><p class = center-block-text>Press <strong>enter</strong> to continue.</p></div>","rt":916,"key_press":13,"block_duration":916,"timing_post_trial":0,"trial_id":"end","exp_id":"test-task","trial_type":"poldrack-text","trial_index":5,"time_elapsed":15135,"internal_node_id":"0.0-6.0","credit_var":true,"performance_var":676,"full_screen":false,"focus_shifts":0}]',
  'test-task',
  1)]
row[0][0]is the index for the result table, probably not usefulrow[0][1]is a python datetime object for when the result was createdrow[0][2]is the data from the experimentrow[0][3]is the experiment id (exp_id)row[0][4]is the participant id
Again, you should consider a robust and secure setup when running this in production. For the example, don’t forget to shut down your database after the image.
docker stop expfactory-postgres
docker rm expfactory-postgres
The reason to provide these arguments at runtime is that the particulars of the database (username, password, etc.) will not be saved with the image, but specified when you start it. Be careful that you do not save any secrets or credentials inside the image, and if you use an image with an existing expfactory config.py, you re-generate the secret first.
CouchDB/MariaDB/Mongo/Other
We haven’t yet developed this, and if you are interested, please file an issue. If you need help with more substantial or different deployments, please reach out!
Start your Participant
Here we assume that you have chosen some database and that your container is running, and will look quickly at the experience of running a participant through a selection of experiments. From the commands above, we see that we generated and started our container, and mapped it to port 80 on our machine.
Not mapping a folder to /scif/data assumes that either we don’t want to see files on the host, or if the image default is to save to a relational database external to the experiments container itself, we access data by querying this separate endpoint. For a filesystem or sqlite database, since the file is stored inside the container and we want access to it, we likely started with the location mapped:
docker run -p 80:80 -v /tmp/data:/scif/data vanessa/expfactory-experiments start
First, let’s discuss the portal - what you see when you go to 127.0.0.1.
The Experiment Factory Portal
When you start your container instance, browsing to your localhost will show the entrypoint, a user portal that lists all experiments installed in the container. If you have defined a limited subset with --experiments you will only see that set here:
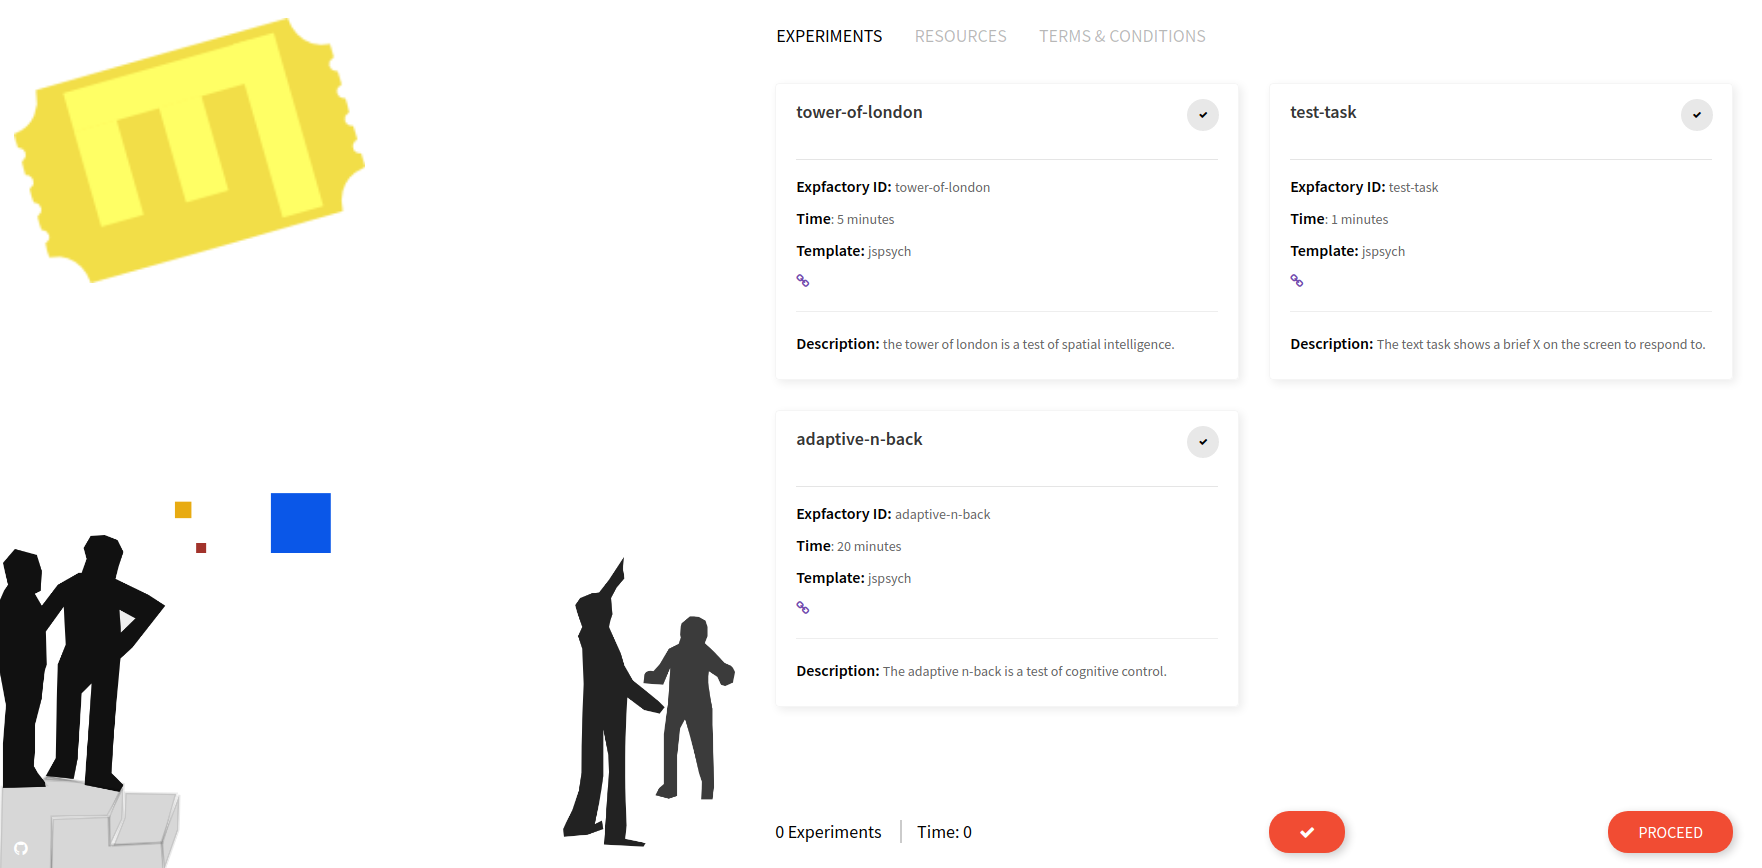
This is where the experiment administrator would select one or more experiments, either with the single large checkbox (“select all”) or smaller individual checkboxes. When you make a selection, the estimated time and experiment count on the bottom of the page are adjusted, and you can inspect individual experiment times:
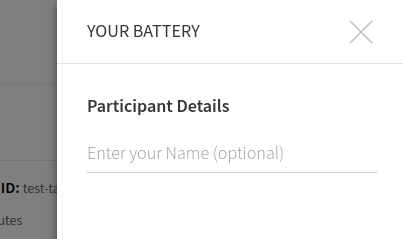
You can make a selection and then start your session. I would recommend the test-task as a first try, because it finishes quickly. When you click on proceed a panel will pop up that gives you choices for ordering and an (optional) Participant name.
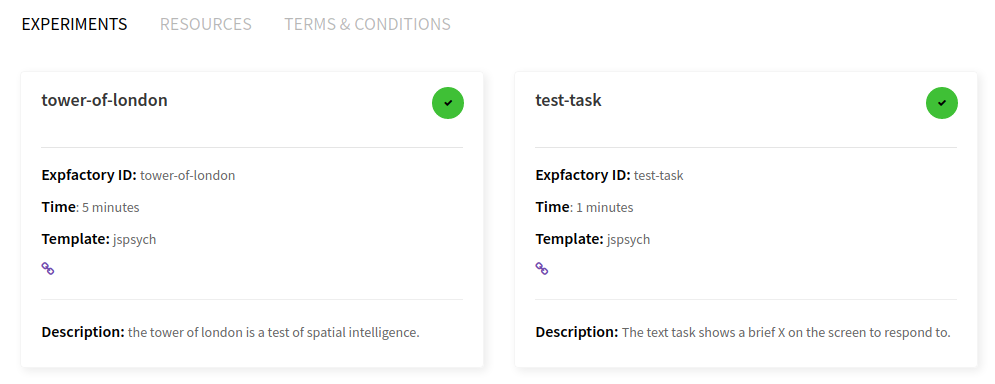
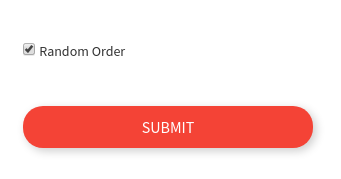
If you care about order, the order that you selected the boxes will be maintained for the session:
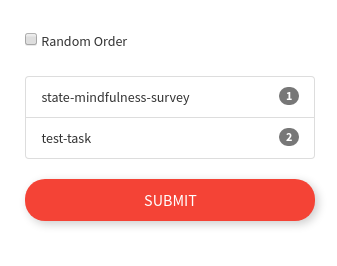
or if you want random selection, just check the box. This is the default setting.
This name is currently is only used to say hello to the participant. The actual experiment identifier is based on a study id defined in the build recipe. After proceeding, there is a default “consent” screen that you must agree to (or disagree to return to the portal):
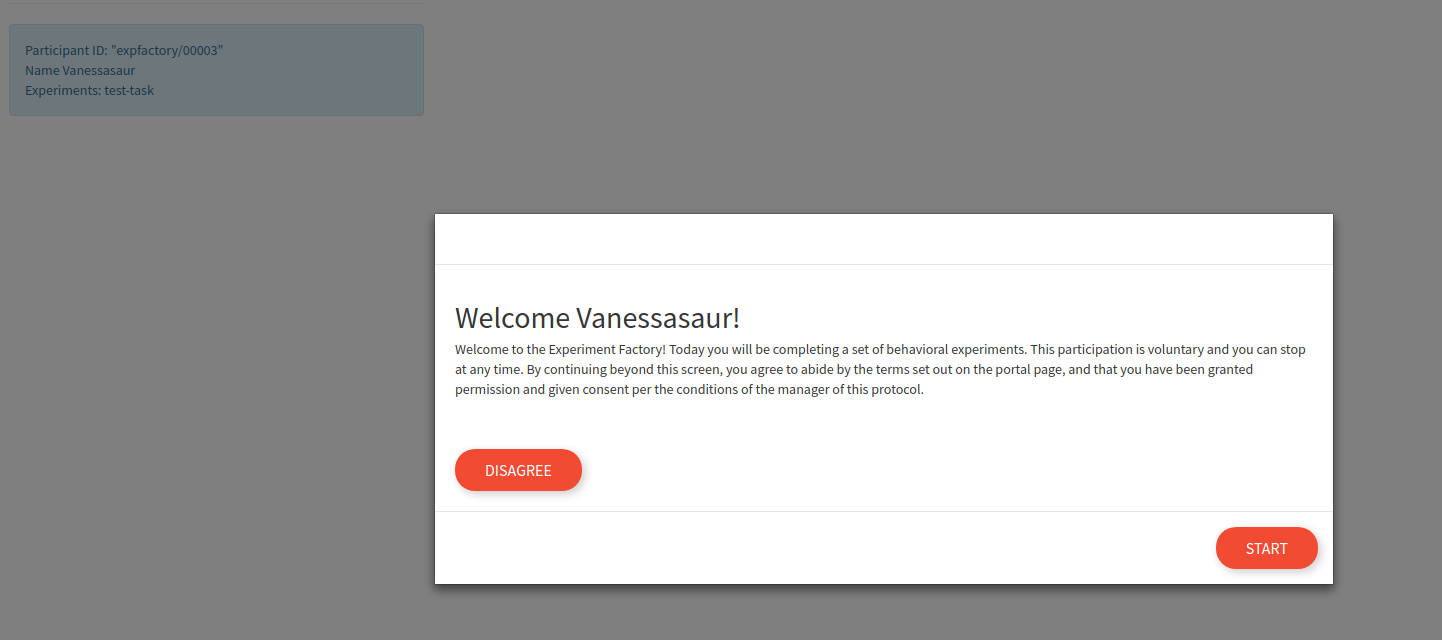
Once the session is started, the user is guided through each experiment (with random selection) until no more are remaining.

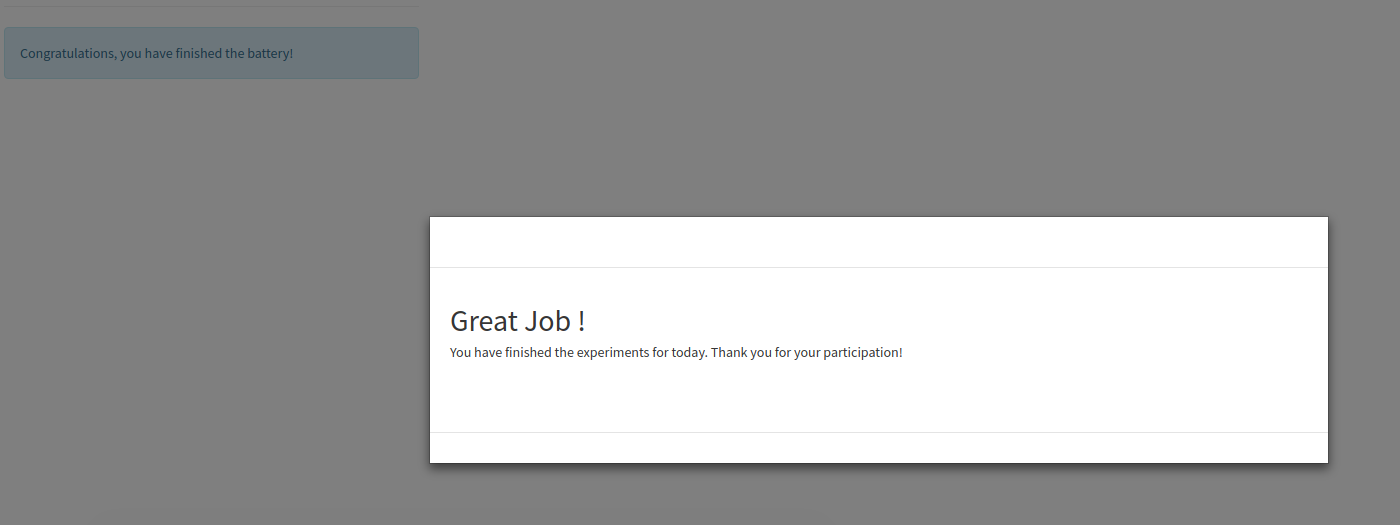
When you finish, you will see a “congratulations” screen
Generally, when you administer a battery of experiments you want to ensure that:
- if a database isn’t external to the container, the folder is mapped (or the container kept running to retrieve results from) otherwise you will lose the results.
- if the container is being served on a server open to the world, you have added proper authorization (note this isn’t developed yet, please file an issue if you need this)
- you have fully tested data collection and inspected the results before administering any kind of “production” battery.
Working with JSON
Whether you find your json objects in a file (filesystem) or saved in a text field in a relational database (sqlite) you will reach some point where you have a bunch of json objects to parse to work with your data. Json means “JavaScript Object Notation,” and natively is found in browsers (with JavaScript, of course). It’s flexibility in structure (it’s not a relational database) makes it well suited to saving experiments with many different organizations of results. This also makes it more challenging for you, the researcher, given that you have to parse many experiments with different formats. Generally, experiments that use the same paradigm (e.g., jspsych or phaser) will have similar structures, and we can show you easily how to read JSON into different programming languages.
We have provided example scripts in a gist for Python and R (at the bottom) that you can easily run to “extract” the inner json data structure, and then it can be loaded into your software of choice. Generally, the usage is as follows:
wget https://gist.githubusercontent.com/vsoch/76d8933e3ff7e080883362b8baa4a164/raw/9236b3877ad848d848a1391a940b105645ee71ba/parse.py
python parse.py stroop-results.json

# or for more than one file at once
python parse.py stroop-results.json go-no-go-results.json
The above command will produce equivalently named files in the present working directory prefixed with “parsed_”.
And here is the same shown in python, if you want to implement your own parser:
# python

import json

with open('test-task-results.json','r') as filey:
    content = json.load(filey)

# What are the keys of the dictionary?
content.keys()
dict_keys(['data'])
You are probably expecting another dictionary object under data. However, we can’t be sure that every experiment will want to save data in JSON. For this reason, the key under data is actually a string:
type(content['data'])
str
And since we know jspsych saves json, it’s fairly easy to load the string to get the final dictionary:
result = json.loads(content['data'])
Now our result is a list, each a json object for one timepoint in the experiment:
result[0]
{'focus_shifts': 0,
 'internal_node_id': '0.0-0.0-0.0',
 'full_screen': True,
 'key_press': 13,
 'exp_id': 'tower-of-london',
 'time_elapsed': 1047,
 'trial_index': 0,
 'trial_type': 'poldrack-text',
 'trial_id': 'instruction',
 'timing_post_trial': 0,
 'rt': 1042,
 'text': '<div class = centerbox><p class = center-block-text>Welcome to the experiment. This experiment will take about 5 minutes. Press <strong>enter</strong> to begin.</p></div>',
 'block_duration': 1042}
My preference is to parse the result like this, but if you prefer data frames, one trick I like to do is to use pandas to easily turn a list of (one level) dictionary into a dataframe, and then you can save to tab delimited file (.tsv).
import pandas

df = pandas.DataFrame.from_dict(result)
df.to_csv('tower-of-london-result.tsv', sep="\t")
You should generally use a delimiter like tab, as it’s commonly the case that fields have commas and quotes (so a subsequent read will not maintain the original structure).
Feedback Wanted!
A few questions for you!
- Would password protection of the portal be desired?
To best develop the software for different deployment, it’s important to discuss these issues. Please post an issue to give feedback.
The Experiment Factory, by way of its modular containers, has many good friends! Take a look below at the different options you have for integrations.
- Surveys A survey integration is a simple plugin that uses Google Material Design Lite to administer form based surveys. Here we have prepared an automated builder to help you generate a survey folder.
- Robots: The Experiment factory robots are a set of scripts (and associated containers) that provide an automated means to run through experiments or surveys.
- LabJS LabJS is a beautifully done web interface for interactive experiment generation, and you can now export your experiments directly into folders ready for the Experiment Factory!
Contribute
Contribute a Container
This guide is intended for when you have a finished experiment and want to contribute it to the library. For steps on how to develop the experiment in the container environment itself, see our developer’s guide
If you’ve finished your container and want to add it to the recipes page for others to find and use, then you simply need to add an entry to the containers file to provide a name, link, and container base. You can do this via a pull request (meaning you would fork the repository, clone your fork, make changes, commit, and then file a pull request against the main repository) or simply file an issue with the following fields and the container will be added for you.
- name: expfactory-games
  base: "docker"
  url: "https://hub.docker.com/r/vanessa/expfactory-games/"
  maintainer: "@vsoch"
  description: Example Docker container with all experiment factory (phaser) games
- name: a human friendly name or title for your container
- base: the container technoloy (likely Docker)
- url: a url for your container. In the example above, there is no Github repository so Docker Hub is used.
- maintainer: an alias to identify you if there are questions about the container
- description: a more verbose description of your container.
The idea here is that you can find others with similar work to your own, and collaborate.
Contribute an Experiment
This guide will walk you through contribution of an experiment. We are still developing these steps, and there may be small changes as we do.
Prerequisites
Developer Pre-reqs
You should understand basic html and css (or another web syntax of your choice) and how to create some form of web application that collects data and then can submit via a POST. If you are developing a web experiment, you should also understand how to bring up a basic web server to test your experiment. This is a very different approach from the first version of the Experiment Factory that expected a predictable template, and performed generation of an experiment behind the scenes. If you don’t have all this knowledge, it’s ok! Just post an issue on our board and we will help. It’s both fun to learn, and fun to participate in open source development.
Experiment Pre-reqs
The most basic experiment contribution could be a web form, an intermediate contribution might be using a tool like jspsych to generate an experiment, and a more substantial contribution would use some web framework that requires “compiling” a final application (e.g., nodejs). Minimally, your final experiment must meet the following criteria:
- all dependencies can be included in a folder: While content delivery networks (CDNs) are great for obtaining resources, you can be more assured of having a file if you download it locally.
- the experiment runs via a single file: The server will be authenticating pages based on sessions and CSRF. For now, your experiment is required to run on a single page, meaning that the
POSTto save data comes from the same page where the experiment started. - the experiment runs statically When it finishes, it posts to
/finish, and on successful POST redirects to/next. - (optional) documentation about any special variables that can be set in the Dockerfile (the build recipe - more on this later).
- experiment completion should have a POST of json data (
{"data": data}) to/save. If successful, it navigates to/next. If not successful, data should be saved locally in the format of your choice (for preview and testing purposes). The server will by default look for the post to have adatafield and use it. If not found, it will use the entirePOST.
The general steps
The general steps are the following:
- create an experiment repository
- write a metadata
config.jsonfile to describe it - test your experiment locally
- make a pull request to this library repository to request addition of your experiment
Each of these steps is outlined in detail below.
The experiment repository
You will want to first make an experiment repository. The repository should contain all required files (css style sheets, javascript, and other image and media) that are required to run your experiment. To get an idea of what your repository will end up containing, have a look at the test task, which is an experiment built with jsPsych. If you’ve never used Github before, it’s ok! There are plenty of guides available to learn, and this is a good time to start. So you will want to:
- if you don’t have one, create a Github account
- create a remote repository in the Github interface
- clone your repository to your local machine
- create your experiment in the repository folder, add files, and push!
Important make sure that once you have pushed your experiment, you go into the settings and have github pages render on the master branch. This means that a preview of your experiment will always be available on the web, served directly from your repository. For this example, we clicked the “Settings” tab from the main repository branch, and then scrolled (very far down!) to set the following:
It’s also helpful to copy paste this address and add it to the main repository description along with meaningful “topic tags” so other users can preview it easily.

Now let’s pretend we created our Github remote, and have our experiment in our local repository (a folder on your machine with the .git hidden directory). We need to bring up a web server, and open our browser to the port we are using to see our experiment. The easiest way to bring up a server is by using python. If you cd into the folder and run:
cd my-experiment/

python -m http.server 9999         # python 3
python2 -m SimpleHTTPServer 9999   # python 2
Serving HTTP on 0.0.0.0 port 9998 ...
The last number (9999) is the port. The modules are actually the same, but the python2 version was migrated to be part of http.server in Python 3. When you see the message that the experiment is being served, open your browser to localhost:9999 your experiment should run. For a static experiment, that means presence of an index.html file. If you require building or compiling, do this before you run the server, and have the final result be an index.html. We will discuss more complicated setups that might require variables and/or building later. For now, let’s discuss the simplest use case, this static experiment with HTML and CSS that can submit some JSON result when the participant finishes. At this point you should test that your experiment runs as you would expect.
My experiment isn’t running! The most common issues have to do with missing dependencies (js or css files) and you can debug by looking in the console of your browser. In Chrome/Firefox this means right clicking on the window, clicking “Inspect” and then you see the developers console pop up. if you look at the “Console” tab you will likely see the issue. For example, here is an early test where I had forgotten to update paths for a series of files:
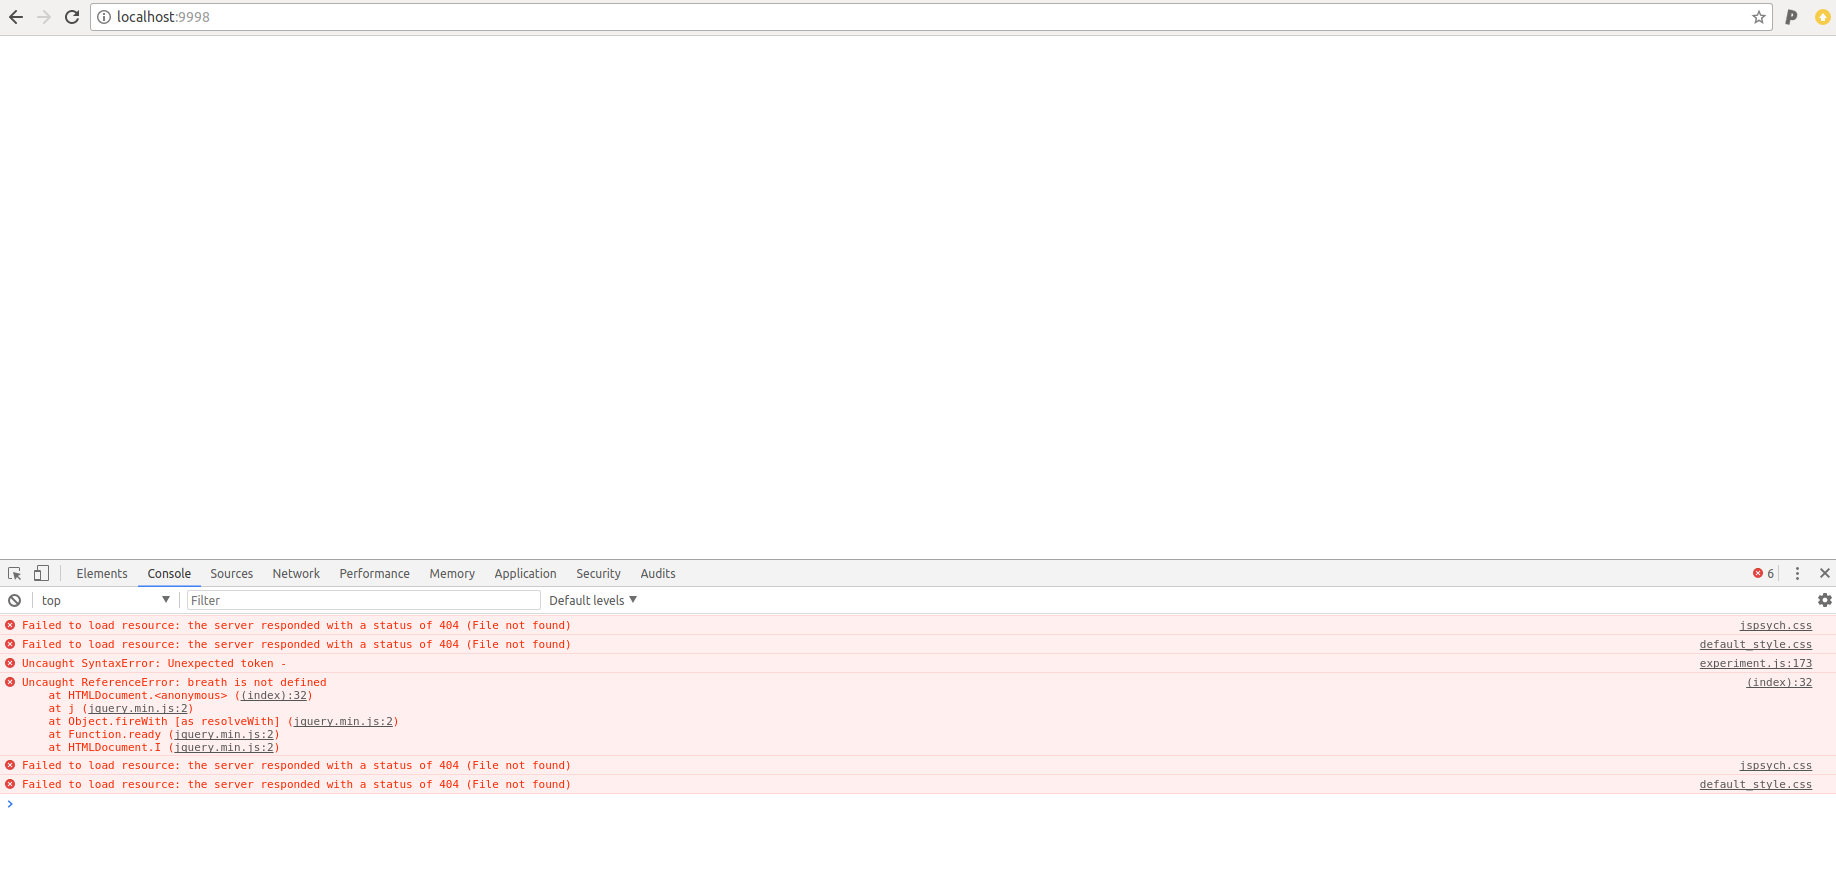
I could then change the paths, and refresh the page, and see the experiment!
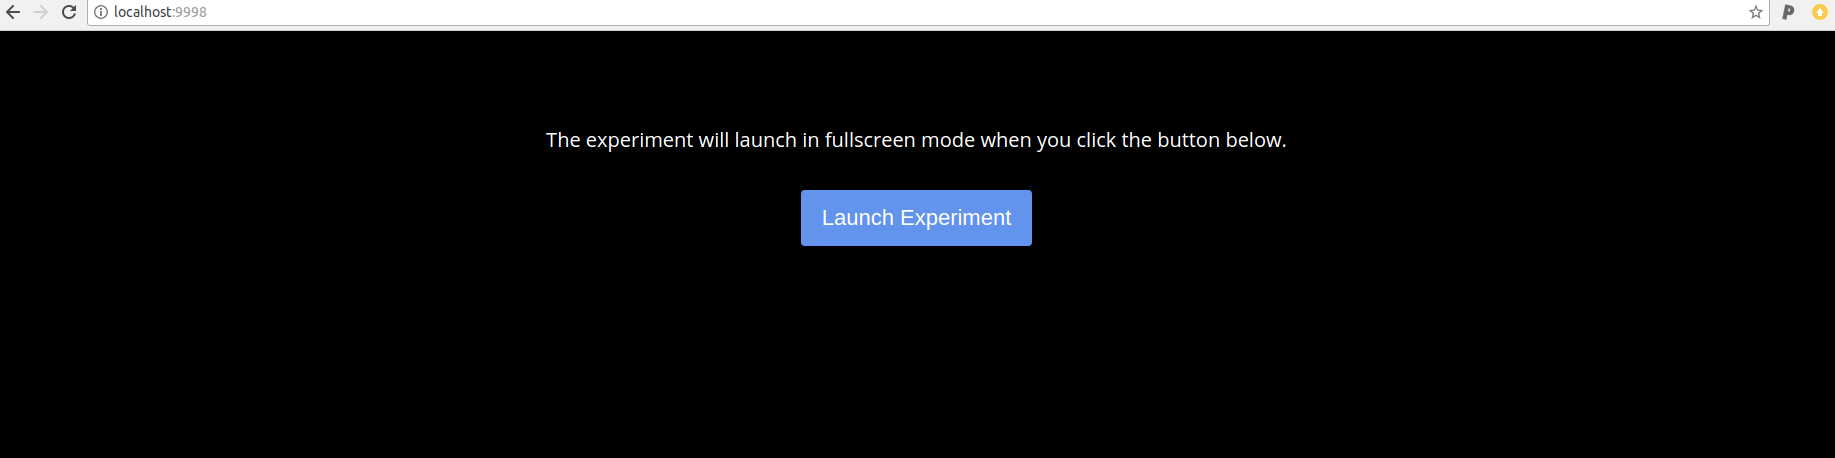
Note that you don’t need to restart the python web server to see changes, you can just refresh the page. This is the beauty of statically served content!
The experiment config
Great! Once you are here, you have a folder with a working experiment. This is no small task! In order to make your experiment programatically accessible, we require a configuration file, a config.json file that lives in the root of the experiment repository. A config.json should look like the following:
{
    "name": "Test Task",
    "exp_id": "test-task",
    "description": "A short test task to press spacebar when you see the X.",
    "instructions": "Press the spacebar. Derp.",
    "url": "https://github.com/expfactory-experiments/test-task",
    "template":"jspsych",
    "cognitive_atlas_task_id": "tsk_4a57abb949dc8",
    "contributors": [
                     "Ian Eisenberg",
                     "Zeynep Enkavi",
                     "Patrick Bissett",
                     "Vanessa Sochat",
                     "Russell Poldrack"
                    ],
    "time":1,
    "reference": ["http://www.sciencedirect.com/science/article/pii/0001691869900651"]
}
name: Is a human friendly name for the experiment [required].install: should be a list of commands to compile, build, etc. your experiment. This is not required unless your experiment index.html needs some kind of custom generation. You must include installation of all dependencies.exp_id: is the experiment factory unique identifier. It must be unique among other experiment factory-provided experiments [required]. It must also correspond to the repository name that houses the experiment [required].description: A brief description of your experiment [required].instructions: What should the participant do? [required].url: is the Github full url of the repository. The experiment must be served (for preview) via Github pages (easiest is to serve “master”).template: is an old legacy term that described experiment types for version 1.0 of the Experiment Factory. It doesn’t hurt to keep it.contributors: is a list of names, emails, or Github names for people that have contributed to the generation of the experiment.cognitive_atlas_task_id: is an identifier for the Cognitive Atlas task for the experiment, if applicable.time: is an integer value that gives the estimated time for the experiment to run [required]reference: is a list of articles, link to documentation, or other resource to provide more information on the experiment. ```
You can add whatever metadata you want to the config.json, and you can also add labels to the container to be programatically accessible (more later on this). You should not keep a version in this metadata file, but instead use Github tags and commits. This information will be added automatically upon build of your experiment container. We also strongly encourate you to add a LICENSE file to your work.
Test the Experiment
Your experiment will be tested when you submit a pull request (as we just showed above). However you can run the tests before filing the PR. There are three kinds of tests, testing an experiment testing a contribution, and testing an install. You likely want to do the first and second, minimally, and ideally the third:
- an experiment is a single folder with static content to serve an experiment. Usually
this means an
index.htmlfile and associated style (css) and javascript (js), and the config.json we just talked about above. This test is appropriate if you’ve prepared an experiment folder but haven’t yet pushed to Github. - a contribution is a submission of one or more experiments to the library, meaning one or more markdown file intended to be added to the
_libraryfolder. The contribution tests also test the experiments, but retrieves them from your repository on Github. Thus, this test is useful when you’ve pushed your experiment to Github, and want to (locally) test if it’s ready for the library. - an install means that you’ve finished your experiment, and want to see it running in the experiments container.
For the cases above, you can use the quay.io/vanessa/expfactory-builder image to run tests. It assumes mounting either a directory with one or more experiment subfolders.
Note that bases for expfactory were initially provided on Docker Hub and have moved to Quay.io. Dockerfiles in the repository that use the expfactory-builder are also updated. If you need a previous version, please see the tags on the original Docker Hub.
Test an Experiment
Testing an experiment primarily means two things: some kind of static testing for content, and a runtime test that the experiment functions as we would expect.
Runtime Test
When you submit an experiment for review, given that the repository for the experiment is also hosting it on the Github pages associated with the repository, it’s likely easy enough for you and your reviewers to test the experiment using Github pages. However, for predictable experiment layouts (e.g., jspsych) we have developed a set of Experiment Robots that you can use for hands off interactive testing.
Static Testing
You have two options to test experiments on your host using quay.io/vanessa/expfactory-builder. If you want to test a single experiment, meaning a folder with a config.json file:
my-experiment/
    config.json
then you should bind directory to it like this:
docker run -v my-experiment:/scif/apps quay.io/vanessa/expfactory-builder test
Testing experiments mounted to /scif/apps
....Test: Experiment Validation

----------------------------------------------------------------------
Ran 1 test in 0.001s

OK
If you want to test a group of experiments (a folder with subfolders, where each subfolder has a config.json):
experiments/
    experiment-1/
        config.json
    experiment-2/
        config.json
    ...
    experiment-N/
        config.json
then you can bind the the main top level folder like this:
docker run -v experiments:/scif/apps quay.io/vanessa/expfactory-builder test
Testing experiments mounted to /scif/apps
.
----------------------------------------------------------------------
Ran 1 test in 0.007s

OK
...Test: Experiment Validation
Found experiment tower-of-london
Found experiment test-task
Found experiment digit-span
Found experiment adaptive-n-back
Found experiment angling-risk-task
Found experiment breath-counting-task
Found experiment angling-risk-task-always-sunny
Found experiment spatial-span
Found experiment emotion-regulation
Remember that these tests are primarily looking at metadata, and runtime of your experiment still will need to be tested by a human, primarily when installed in the container.
Test a Contribution
This set of tests is more stringent in that the test starts with one of more submissions (markdown files that you will ask to be added to the _library folder via a pull request) and goes through Github cloning to testing of your preview. Specifically it includes:
- discovery of any markdown files in the bound folder
- parsing of the files for required fields
- download of the Github repositories to temporary locations
- testing of the Github repository config.json, and preview in Github pages
You need to bind the folder with markdown files for the library to /scif/data this time around. These tests have a lot more output because they are more substantial:
docker run -v $PWD/_library:/scif/data quay.io/vanessa/expfactory-builder test-library
Test an Installation
Testing an installation is likely the most important, and final step. We mimic the same steps of generating a “full fledged” container to remain consistent. You will want to generate a base container, and install your experiment to it. We can use the builder to generate our recipe as we did before. It’s good practice to include the test-task so you can test transitioning to the next experiment.
mydir -p /tmp/recipe
docker run -v /tmp/recipe:/data quay.io/vanessa/expfactory-builder build test-task
then build your container
cd /tmp/recipe
docker build -t expfactory/experiments .
Finally, start the container (and make sure to bind a local folder if you need it, otherwise Github install works)
docker run -p 80:80 -d expfactory/experiments
Remember if you need to shell inside, you can do docker exec -it <containerid> bash and if you want to bind a folder from the host, use -v. You want to make sure that:
- the experiment metadata you would expect is rendered in the portal
- the experiment starts cleanly, including all static files (check the console with right click “Inspect” and then view the “console” tab)
- the experiment finishes cleanly, and outputs the expected data in
/scif/data. - the experiment transitions cleanly to the next, or if it’s the only experiment, the finished screen appears.
Add the Experiment
When your experiment is ready to go, you should fork the library repository, and in the experiments folder, create a file named equivalently to the main identifier (exp_id) of your experiment in the folder docs/_library. For example, after I’ve cloned the fork of my repo, I might check out a new branch for my task:
$ git checkout -b add/breath-counting-task
Switched to a new branch 'add/breath-counting-task'
and then I would create a new file:
touch docs/_library/breath-counting-task.md
and it’s contents would be:
---
layout: experiment
name:  "test-task"
maintainer: "@vsoch"
github: "https://github.com/expfactory-experiments/test-task"
preview: "https://expfactory-experiments.github.io/test-task"
tags:
- test
- jspsych
- experiment
---

This was a legacy experiment that has been ported into its Experiment Factory Reproducible Container version. If you'd like to make the experiment, it's documentation, or use better, please contribute at the repositories
linked below.
The layout should remain experiment (this just determines how to render the page, in case we want to add other kinds of rendering in the future). The name should correspond with the exp_id (test-task) and both Github and Repo are required (this is a sanity check to ensure that, when we test, the repository you are claiming to have the task has a config.json that claims the same thing). For tags, add any terms that you think would be useful to search (they are generated automatically in the experiment table).
The content on the bottom can be anything that you want to say about the experiment. You can include links, background, or even custom content like video. This input will render markdown into HTML, and also accepts HTML, so feel free to add what you need to describe your experiment. An example of the rendered page above can be seen here. When you are done, add the newly created file with a commit to your local repository:
git add docs/_library/breath-counting-task.md
git commit -m "adding the breath counting task to library"
 1 file changed, 14 insertions(+)
 create mode 100644 docs/_library/breath-counting-task.md
and then push!
git push origin add/breath-counting-task
You should then be able to go to the expfactory library interface and click the button to do a pull request that is across forks to the expfactory master branch. Github is usually pretty clever in knowing when you’ve recently commit to a branch associated with a repository. For example, when I browsed to the expfactory experiments library main repo, I saw:
Deploying Experiments
Once you get here, you’ve probably had your experiment pull request approved and merged! After this, your experiment will be made available in the library. More information will be added about using the library as it is developed. You can then add your experiment to a Reproducible Experiments Container, along with any of the other selection in the library. Read about usage for your different options if you haven’t yet.
Contribute a Survey
A survey is (for now) just an experiment that is primarily questions. You can take a look at some our examples in the experiments library, or if you want to easily generate a new survey, see our survey generator integration.
Interactive Development
This contribution comes from one of our users, and has been modified to fit your screen. Thank you @tylerburleigh!
This page contains recipes for forking an expfactory task and preparing it for an easier development workflow. For example, maybe you want to run a Stroop task, but you want to increase the number of trials, or change the instructions text. You can also take a base task and use that to create something entirely new! Because many cognitive paradigms follow similar procedures, this can really speed up the development time.
Checklist
To begin, you will need:
- A Linux server with Docker installed, or your own computer if you run Linux.
- An expfactory task that you want to use as your base, to fork.
(Take a look at the library of tasks.) - The ability to SSH into the web server (this is how we access the terminal/console to do stuff; I use PuTTY)
I like to use DigitalOcean for my web servers, and for this tutorial I’ll be forking the kirby task. My linux user is bitnami, so you will also be seeing that in the code below.
Recipes
Set shell variables
First we’ll set some shell variables to make the other recipes more streamlined. HOME should point to the home directory for a user on your web server. Since I’m running as the bitnami user, I’ll put it all there. TASK should refer to the task that you want to fork.
TASK=kirby
HOME=/home/bitnami
Make directories
Like me, for the sake of convenience you’ll probably want to access the data and the logs from outside the Docker container. This doesn’t impact the containerization. It just lets you access output from the experiment more easily once you have everything up and running.
mkdir -p $HOME/expfactory/$TASK
mkdir -p $HOME/expfactory/$TASK/data
mkdir -p $HOME/expfactory/$TASK/logs
chmod -R 777 $HOME/expfactory/$TASK/
Generate Dockerfile
Now we’ll change to the task directory we created above and build the Dockerfile in that directory.
# go to directory
cd $HOME/expfactory/$TASK/

docker run -v $HOME/expfactory/$TASK:/data \
  vanessa/expfactory-builder \
  build $TASK
Depending on your Docker installation, you might need to use
sudowith Docker. It’s not recommended to install in this way, but the note is preserved here since the original post had used it.
Great! Now if you issue a dir command you will see the following folders/files: data Dockerfile logs startscript.sh
Build container
Next we’ll build the docker container, using the Dockerfile we just created.
docker build -t expfactory/experiments .
Clone task files to host directory
Now, while we are developing the task, we want to make it as easy as possible to modify “on the fly”, even while it is running in a container. To do this, first we must clone the task files from github to a local directory:
cd /home/bitnami
git clone https://github.com/expfactory-experiments/$TASK.git
chmod -R 777 $TASK
cd $TASK
You could imagine here that instead of cloning the repository with the task, you might have your own local folder you are using instead. We still recommend you put it under version control, and then perhaps contribute it to the library!
Run container
Now we run the container. When we run the container, we pass it all of the folders that we created before.
docker run -d \
   -d -p 80:80 \
   -v $HOME/expfactory/expfactory:/opt/expfactory \
   -v $HOME/expfactory/$TASK/data:/scif/data \
   -v $HOME/expfactory/$TASK/logs:/scif/logs \
   -v $HOME/$TASK:/scif/apps/$TASK \
   expfactory/experiments
Ready to go!
Now it should be up and running. By default, expfactory runs over port 80, so you should be able to access it by typing the URL of your server into a web browser.
Because of the configuration we’ve used in these recipes, the task files are served out of /home/$TASK on the host-side. This makes it really easy to work with during the development process. The file that you probably want to start hacking away at is /home/$TASK/experiment.js, and the data will be stored in $HOME/expfactory/$TASK/data. After you’ve modified the task, you can reload the site in your browser to see the changes live.
When you finally complete your task, you should make it official by contributing it to the library! Happy coding!
The Experiment Library
The experiment library is available for you to browse at https://expfactory.github.io/experiments. It contains over 100 experiments, surveys, and games from the original Experiment Factory, along with community contributions. From this interface you can browse to an experiment GitHub repository, or preview the experiment right in the browser.
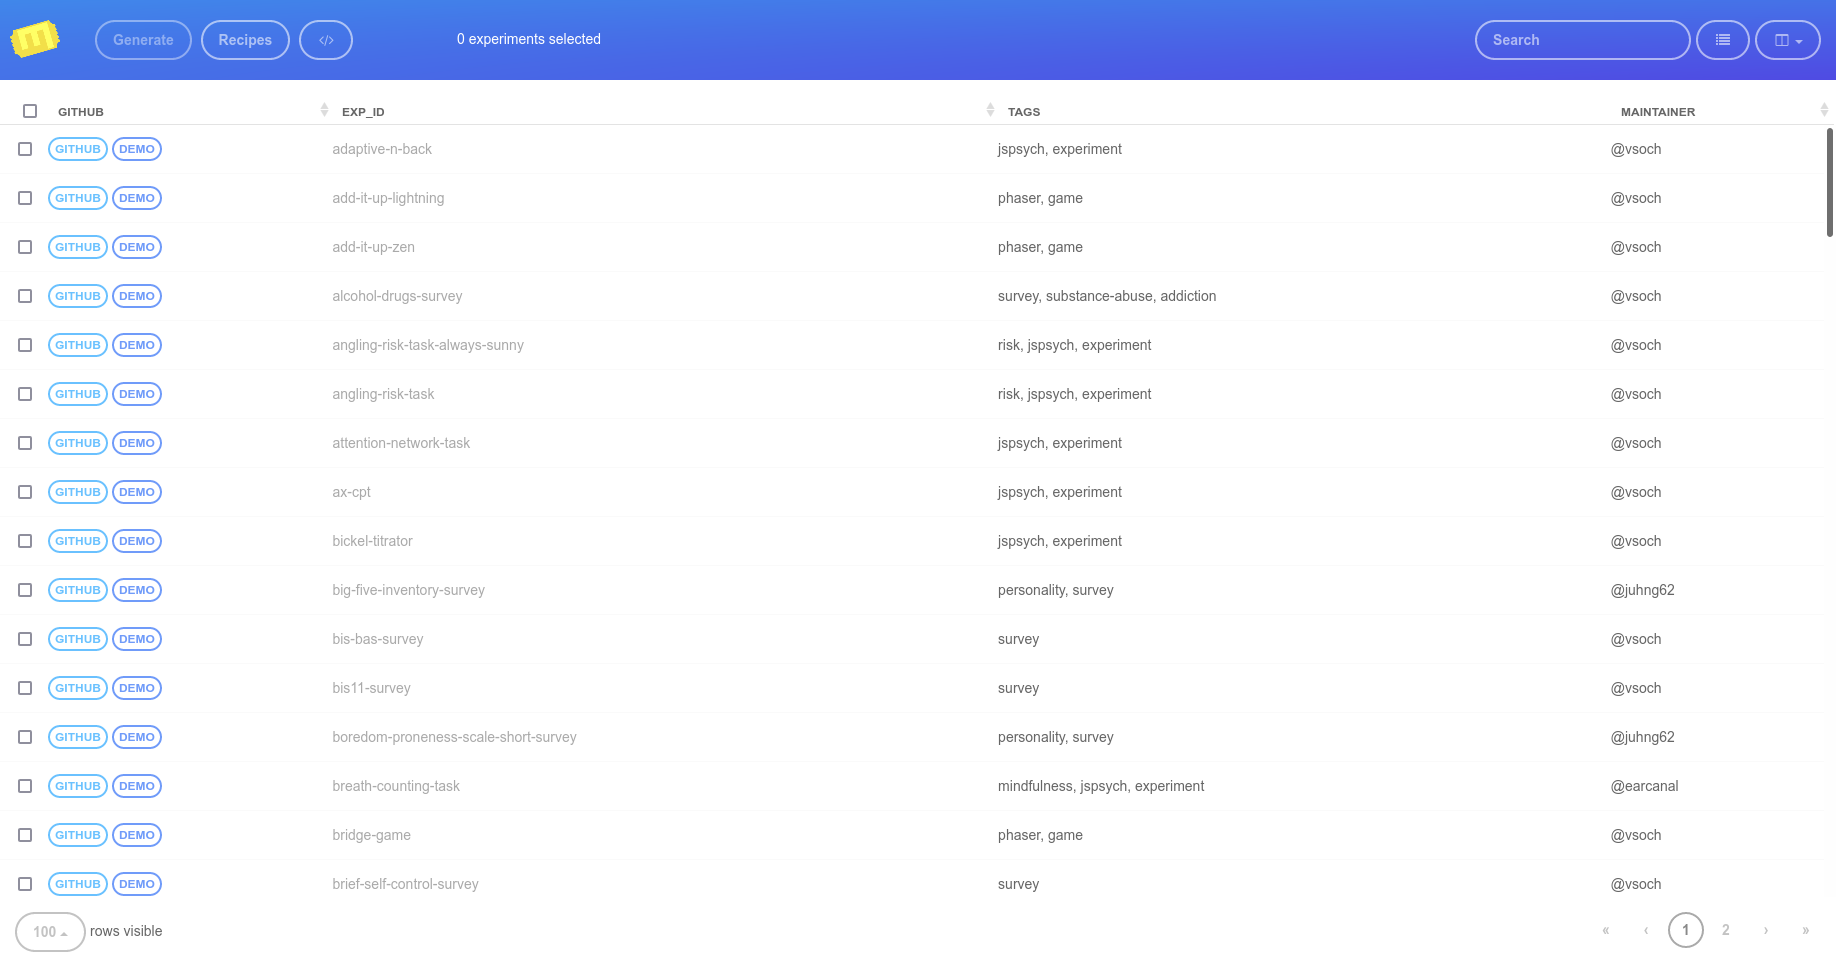
How does it work?
Each experiment is maintained in a modular fashion in its own GitHub repository. For example, the big-five-inventory-survey you can find in the linked repository, and the preview is on GitHub pages. Since it is part of the experiment library that renders to the table above, it is also available programmatically via API. This is how it works for the Experiment Factory to install an experiment (and remember you can install your own local folders, discussed later in that same section).
Experiment Containers
The documentation here describing how to build your custom experiment container assumes that you want some custom, special mixture of experiments. However, if you just need a quick survey, we have a collection of pre-built containers ready to go! For example, let’s say we want to run the same big-five-inventory-survey. That would look like this:
$ docker run -p 80:80 ghcr.io/expfactory-experiments/big-five-inventory-survey start
Database set as filesystem
Starting Web Server

 * Starting nginx nginx
   ...done.
==> /scif/logs/gunicorn-access.log <==

==> /scif/logs/gunicorn.log <==
[2021-11-10 05:04:18 +0000] [1] [INFO] Starting gunicorn 20.1.0
[2021-11-10 05:04:18 +0000] [1] [INFO] Listening at: http://0.0.0.0:5000 (1)
[2021-11-10 05:04:18 +0000] [1] [INFO] Using worker: sync
[2021-11-10 05:04:18 +0000] [33] [INFO] Booting worker with pid: 33
WARNING No user experiments selected, providing all 1
[2021-11-10 05:04:33,246] INFO in utils: [router] big-five-inventory-survey --> big-five-inventory-survey [subid] expfactory/b64c591b-57cf-4eeb-a336-568a5a920d28 [user] dinosaur
[2021-11-10 05:04:36,087] DEBUG in main: Next experiment is big-five-inventory-survey
And then open your browser to 127.0.0.1 to see the portal, where you can select and proceed to run the experiment.
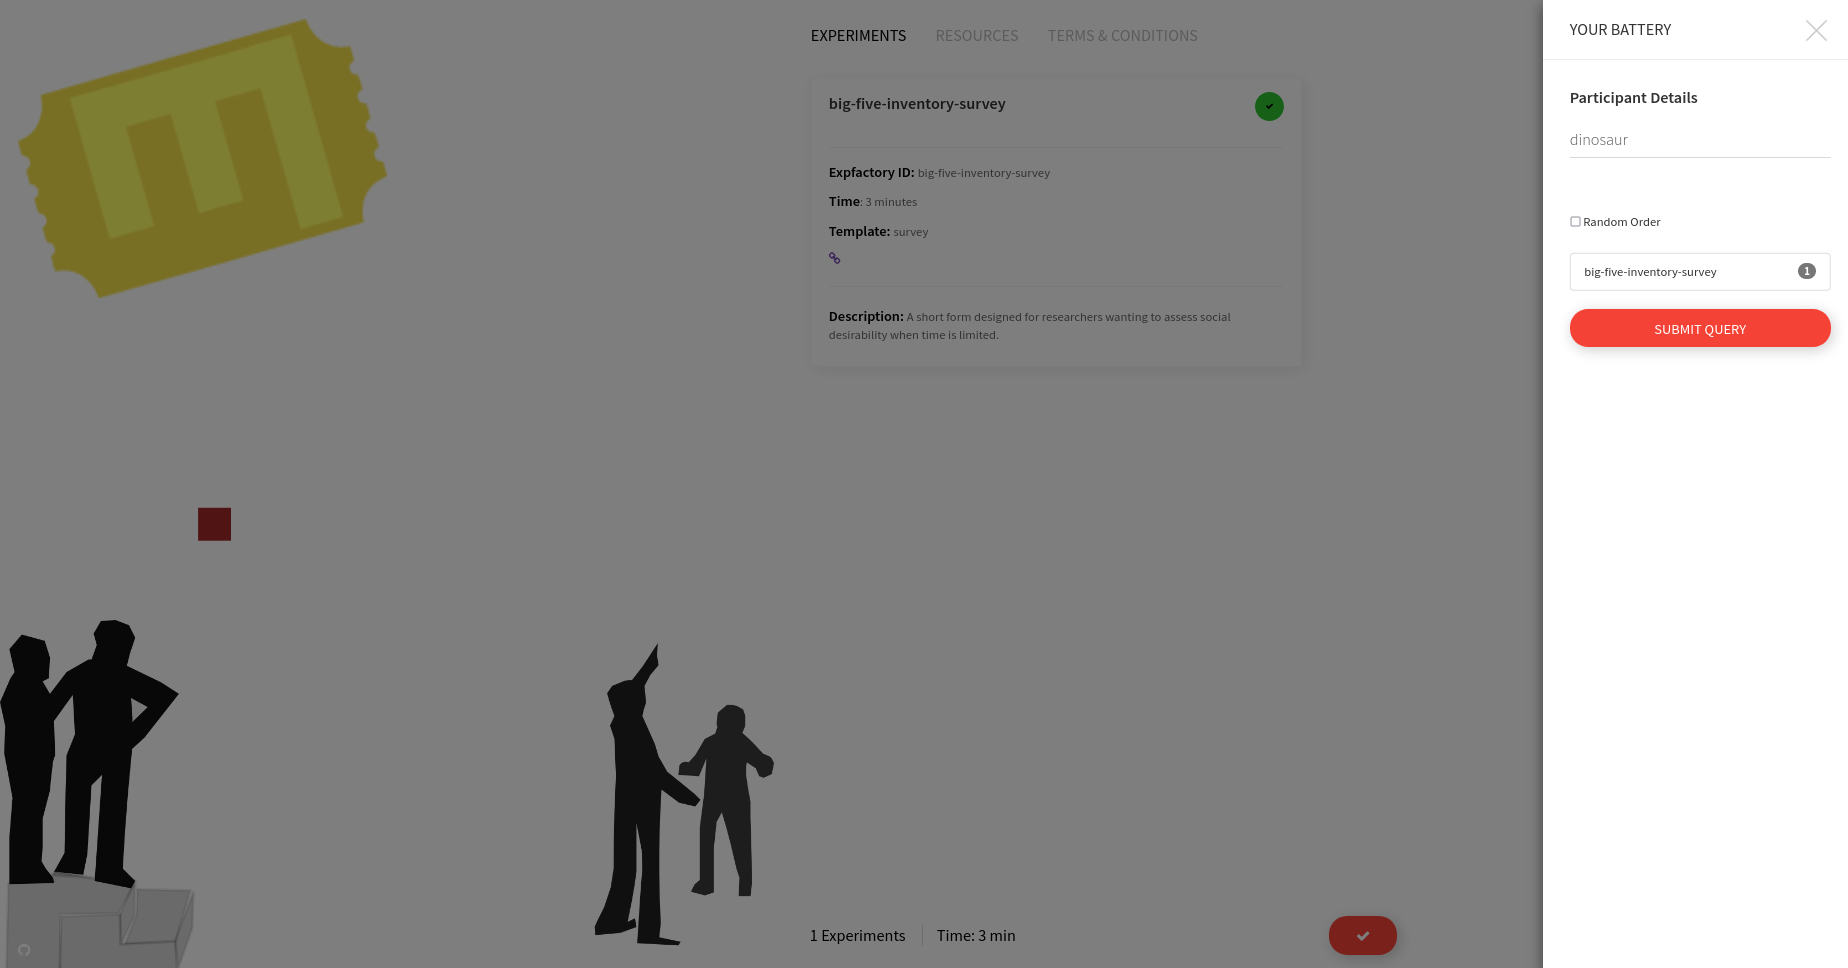
And of course don’t forget there are many ways to customize your container, such as the database so you can collect and analyze your data after, and SSL so you can secure your deployment.
How do I add an experiment to the library?
You can either develop in your own repository and then submit a pull request to add it to the library, or feel free to open an issue and ping @vsoch to get a repository added to expfactory-experiments. This organization can server not just experiments, but also games and surveys.
Experiment Factory :heart: LabJS
If you want to make your own experiment interactively, LabJS can help you! If you want to then build and deploy your experiments into reproducible experiment containers, you can use the expfactory builder, demonstrated here to empower you! This repository is an example of that, with the stroop task (exported from LabJS) built and deployed to Docker Hub via this circle CI workflow:


Design Your Experiment
The first thing you likely want to do is to design your experiment. Take a look at the getting started section of the main README.md file of the LabJS Github repository. There is ample documentation about a started kit, along with a tutorial to build your first experiment. You will (currently) need to use the LabJS beta interface and eventually the LabJS builder interface to design your experiment, and when you finish, the Experiment Factory (v3.0) is an export option:

This will export a zip file of all the files needed to plug into the Experiment Factory! To help you learn and get started, we are providing an example export (stoop-task-export.zip) of a Stroop task in the tutorial repository. At this point, the only thing we need to do is:
- Clone this repository
- Move the experiment into the “experiments” folder
- Connect!
Let’s do this!
0. Clone the repository
The repository has a hidden folder, .circleci with the build and deploy setup that you need. The easiest way to get this to your computer is to fork it to your Github account, and then clone:
git clone https://github.com/<username>/builder-labjs
cd builder-labjs
1. Export and Extract
At this point you would design your experiment in LabJS, and export it as shown in the instructions above. We’ve done this for you, for a stroop task, and we will show you how we did it. Given an exported experiment (stroop-task-export.zip) in the present working directory, let’s first extract the exported experiment. It will dump the required files into a folder in the present working directory.
unzip stroop-task-export.zip
ls
stroop-task
Take a look at the config.json in the folder. It will provide metadata exported about your experiment, and you can customize this if needed before building your container.
cat stroop-task/config.json
{
  "name": "Stroop task",
  "exp_id": "stroop-task",
  "url": "https://github.com/felixhenninger/lab.js/examples/",
  "description": "An implementation of the classic paradigm introduced by Stroop (1935).",
  "contributors": [
    "Felix Henninger <mailbox@felixhenninger.com> (http://felixhenninger.com)"
  ],
  "template": "lab.js",
  "instructions": "",
  "time": 5
}
Finally, we can move the entire thing into the “experiments” folder for it to be discovered by the builder.
mkdir -p experiments
mv stroop-task experiments/
If you wanted to add additional experiments from the library
you could add a single line (space separated) to an experiments.txt file in the main folder. For example, if I wanted to install “test-task” and “tower-of-london” from the library I would have a file called experiments.txt with:
test-task tower-of-london
2. Build
We now will recruit the builder to turn our folder into a reproducible experiment container! Unlike the instructions in expfactory-labjs, we don’t need to do any building or use of Docker locally. We just need to:
- Create a container repository on Docker Hub to correspond to the name you want to build
- Connect the repository to Circle Ci, and
- Commit and push the code to Github
- Add the following environment variables to your CircleCI encrypted environment variables under the project settings:
4.1.
CONTAINER_NAMEshould refer to the container you want to deploy to on Docker Hub. This is usually a/ and in the example here, we used `vanessa/expfactory-stroop`. 4.2. `DOCKER_USER` and `DOCKER_PASS` should coincide with your Docker credentials.
Once you’ve done those steps, that’s it! The container will be built and pushed to Docker Hub on each commit.
3. Run
Once your container is deployed, you can run and use it! There are many ways to do that. Here is a simple headless start:
docker run -d -p 80:80 vanessa/expfactory-stroop start
and you will see the familiar interface to choose your task and get started. Have fun!

Expfactory Robots
The Experiment Factory robots are a set of scripts (and associated containers) that provide an automated means to run through a set of experiments or surveys. We currently have support for experiments with a predictable structure, including jspsych and the surveys produced by the experiment factory generator tool above.

For complete setup and usage, see the most updated docs in the Github repository. Here we will review a “quick start” with a Singularity image.
Singularity Usage
While the primary software is not yet ported into Singularity, we provide tools for you to use for Singularity containers as well. You will need to install Singularity first. Singularity is ideal for this use case because of the seamless nature between the container and host. We have a pre-built image on Singularity Hub for your use:
singularity pull --name expfactory-robots.simg shub://expfactory/expfactory-robots
./expfactory-robots.simg --help
To run the image, you will basically want to bind the parent folder where your task is to /data in the container, and specify the path to the experiment relative to data In the example below, we have cloned the test-task folder in /tmp (/tmp/test-task).
cd /tmp && git clone https://github.com/expfactory-experiments/test-task
and now you can run the robot:
singularity run --bind /tmp:/data expfactory-robots.simg /data/test-task
Recruiting jspsych robot!
[folder] /data/test-task
LOG STARTING TEST OF EXPERIMENT
127.0.0.1 - - [17/Dec/2017 06:52:47] "GET / HTTP/1.1" 200 -
127.0.0.1 - - [17/Dec/2017 06:52:47] "GET /jspsych.css HTTP/1.1" 200 -
127.0.0.1 - - [17/Dec/2017 06:52:47] "GET /default_style.css HTTP/1.1" 200 -
127.0.0.1 - - [17/Dec/2017 06:52:47] "GET /style.css HTTP/1.1" 200 -
127.0.0.1 - - [17/Dec/2017 06:52:47] "GET /js/jquery.min.js HTTP/1.1" 200 -
127.0.0.1 - - [17/Dec/2017 06:52:47] "GET /js/math.min.js HTTP/1.1" 200 -
127.0.0.1 - - [17/Dec/2017 06:52:47] "GET /js/jspsych/jspsych.js HTTP/1.1" 200 -
127.0.0.1 - - [17/Dec/2017 06:52:47] "GET /js/jspsych/plugins/jspsych-text.js HTTP/1.1" 200 -
127.0.0.1 - - [17/Dec/2017 06:52:47] "GET /js/jspsych/poldrack_plugins/jspsych-poldrack-text.js HTTP/1.1" 200 -
127.0.0.1 - - [17/Dec/2017 06:52:47] "GET /js/jspsych/poldrack_plugins/jspsych-poldrack-instructions.js HTTP/1.1" 200 -
127.0.0.1 - - [17/Dec/2017 06:52:47] "GET /js/jspsych/poldrack_plugins/jspsych-attention-check.js HTTP/1.1" 200 -
127.0.0.1 - - [17/Dec/2017 06:52:47] "GET /js/jspsych/poldrack_plugins/jspsych-poldrack-single-stim.js HTTP/1.1" 200 -
127.0.0.1 - - [17/Dec/2017 06:52:47] "GET /js/jspsych/plugins/jspsych-survey-text.js HTTP/1.1" 200 -
127.0.0.1 - - [17/Dec/2017 06:52:47] "GET /js/jspsych/plugins/jspsych-call-function.js HTTP/1.1" 200 -
127.0.0.1 - - [17/Dec/2017 06:52:47] "GET /js/jspsych/poldrack_plugins/poldrack_utils.js HTTP/1.1" 200 -
127.0.0.1 - - [17/Dec/2017 06:52:47] "GET /experiment.js HTTP/1.1" 200 -
127.0.0.1 - - [17/Dec/2017 06:52:48] "GET /%3Cdiv%20class%20=%20%22shapebox%22%3E%3Cdiv%20id%20=%20%22cross%22%3E%3C/div%3E%3C/div%3E HTTP/1.1" 404 -
127.0.0.1 - - [17/Dec/2017 06:52:48] "GET /favicon.ico HTTP/1.1" 200 -
127.0.0.1 - - [17/Dec/2017 06:52:58] "POST /save HTTP/1.1" 501 -
LOG FINISHING TEST OF EXPERIMENT
LOG [done] stopping web server...
The same can be done for a survey folder (e.g., bis11), but specify the --robot
singularity run --bind /tmp:/data expfactory-robots.simg /data/bis11-survey
Recruiting survey robot!
[folder] /data/bis11-survey
LOG STARTING TEST OF SURVEY
127.0.0.1 - - [17/Dec/2017 07:09:38] "GET / HTTP/1.1" 200 -
127.0.0.1 - - [17/Dec/2017 07:09:38] "GET /css/material.blue-red.min.css HTTP/1.1" 200 -
127.0.0.1 - - [17/Dec/2017 07:09:38] "GET /css/surveys.css HTTP/1.1" 200 -
127.0.0.1 - - [17/Dec/2017 07:09:38] "GET /css/jquery-ui-1.10.4.custom.min.css HTTP/1.1" 200 -
127.0.0.1 - - [17/Dec/2017 07:09:38] "GET /css/style.css HTTP/1.1" 200 -
127.0.0.1 - - [17/Dec/2017 07:09:38] "GET /js/jquery-2.1.1.min.js HTTP/1.1" 200 -
127.0.0.1 - - [17/Dec/2017 07:09:38] "GET /js/material.min.js HTTP/1.1" 200 -
127.0.0.1 - - [17/Dec/2017 07:09:38] "GET /js/jquery-ui-1.10.4.custom.min.js HTTP/1.1" 200 -
127.0.0.1 - - [17/Dec/2017 07:09:38] "GET /js/jquery.wizard.js HTTP/1.1" 200 -
127.0.0.1 - - [17/Dec/2017 07:09:38] "GET /js/jquery.form-3.50.js HTTP/1.1" 200 -
127.0.0.1 - - [17/Dec/2017 07:09:38] "GET /js/jquery.validate-1.12.0.min.js HTTP/1.1" 200 -
127.0.0.1 - - [17/Dec/2017 07:09:38] "GET /css/images/ui-bg_flat_75_ffffff_40x100.png HTTP/1.1" 200 -
127.0.0.1 - - [17/Dec/2017 07:09:38] "GET /css/images/ui-bg_highlight-soft_75_cccccc_1x100.png HTTP/1.1" 200 -
127.0.0.1 - - [17/Dec/2017 07:09:38] "GET /favicon.ico HTTP/1.1" 200 -
LOG Testing page 1
LOG Testing page 2
LOG Testing page 3
LOG Testing page 4
LOG Testing page 5
LOG FINISHING TEST OF SURVEY
LOG [done] stopping web server...
Contribute a Survey
A survey is (for now) just an experiment that is primarily questions. Since this is a common need for
researchers, we have developed a simple means to turn a tab separated file into a web-ready experiment.
We will be using the Experiment Factory survey generator (a Docker container) to convert a tab delimited file of questions (called survey.tsv) with a standard experiment factory config.json to generate a folder with web content to serve your experiment.
Usage
First, generate your questions and config. As linked above, the configuration file
has the same requirements as an experiment in the Experiment Factory. For template,
you should put "survey". The survey file should have the following fields in the
first row, the header:
question_type: can be one of textfield, numeric (a numeric text field), radio, checkbox, or instruction. These are standard form elements, and will render in the Google Material Design Lite style.question_text: is the text content of the question, e.g., How do you feel when you wake up in the morning?required: is a boolean (0 or 1) to indicate if the participant is required to answer the question (1) or not (0) before moving on in the survey.page_number: determines the page that the question will be rendered on. If you look at an example survey you will notice that questions are separated by Next / Previous tabs, and the final page has a Finish button. It was important for us to give control over pagination to preserve how some “old school” questionnaires were presented to participants.option_text: For radio and checkboxes, you are asking the user to select from one or more options. These should be the text portion (what the user sees on the screen), and separated by commas (e.g, Yes,No,Sometimes. Note: these fields are not required for instructions or textbox types, and can be left as empty tabs.option_values: For radio buttons, these are the data values that correspond to the text. For example, the option_text Yes,No may correspond to 1,0. For checkboxes, the value will be a copy of the question if (and only if) the box is checked. This field is typically blank for instructions or textbox types.
We have provided a folder with examples (state-mindfulness-survey) that you can use to generate a new survey.
Run the Container
To generate the survey, we will run the container from the folder where our two files are.
If we run without specifying start we will get a help prompt. But really we don’t need to look at it,
because most of the arguments are set in the image. We just need to make sure that
- the
config.jsonandsurvey.tsvare in the present working directory - we specify
start - we map the
$PWD(or where our survey and config are) to/datain the container
Let’s just wget the needed survey.tsv and config.json, because the repository has the completed survey.
mkdir -p /tmp/mindfulness-survey
cd /tmp/mindfulness-survey
wget https://raw.githubusercontent.com/expfactory-experiments/state-mindfulness-survey/master/config.json
wget https://raw.githubusercontent.com/expfactory-experiments/state-mindfulness-survey/master/survey.tsv
ls
config.json    survey.tsv
Make a README to describe your survey!
echo "My Awesome Survey!" >> README.md
The output is minimal, but when we finish, our survey is ready!
$ docker run -v $PWD:/data expfactory/survey-generator start
Writing output files to /data/index.html
index.html
js
css
LICENSE
README.md

$ ls
config.json  css  index.html  js  LICENSE  README.md  survey.tsv
Now we can easily test it by opening a web browser:
python3 -m http.server 9999
If you need to generate the index.html again and force overwrite, use --force.
docker run -v $PWD:/data expfactory/survey-generator start --force
Development
If you want to build the image:
docker build -t expfactory/survey-generator .