Generate an HTTPS Experiment Container
This section will walk through creating a container with https. Much of the steps are the same, but the build and run arguments are a bit different. We will also provide a walkthrough of doing these steps on Digital Ocean using a free domain service, and thanks to Tyler for help with writing and testing this setup. In the case that you don’t yet have a plan for deployment, this is an option, and you can skip the “install Docker” step, because the server we deploy will have it ready to go.
Detailed Start with HTTPS
In these sections, we will be building your container from a customized file with https enabled. If you are starting on a base OS image, You will still need to install Docker first. If you are deploying on Digital Ocean, you don’t need to do this. For either, you should be comfortable with the basic usage. If you don’t need to setup a Droplet (and have your own server provider) jump down to the step to install nginx.
Create an account on Digital Ocean
First create an account with DigitalOcean. DigitalOcean provides cloud computing services. Basically, this means you can rent a server with as much or as little capacity as you want, with the possibility to expand or add features later if you need more capacity. Another nice feature, in the case that you just want to try something out, is that you can also rent a server for as little as 1-hour at a time.
To help Tyler out (and thank him for his contribution!) if you do wind up signing up for Digital Ocean, here is his referral link.
Create a droplet
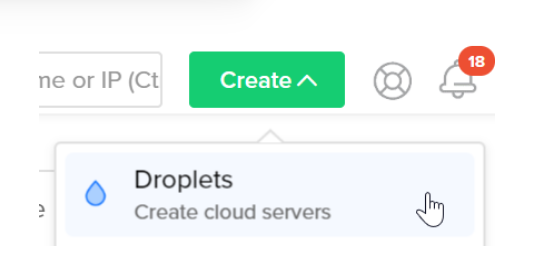
Now that you have an account, we’ll create a “droplet”. This isn’t water in the sky, it’s just a cloud server :) After logging into your account, on the top go to Create -> Droplets.
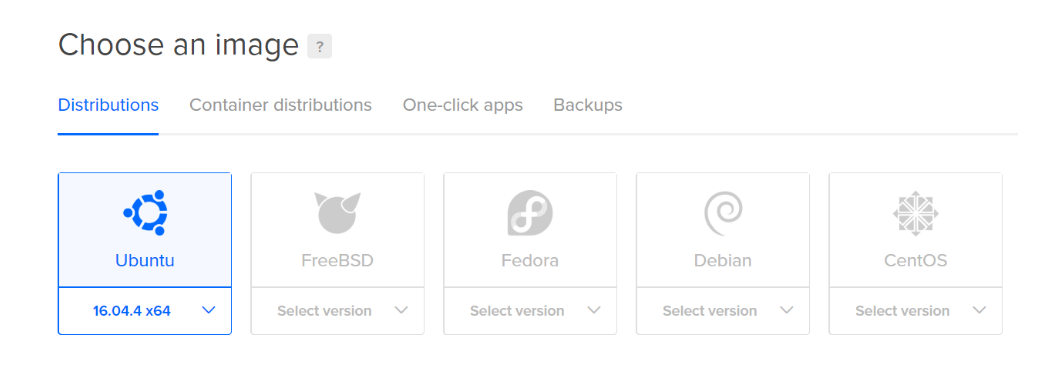
On the next screen you can choose options for your droplet. First, select an image / distribution. We’ll use Ubuntu 16.04.4 x64
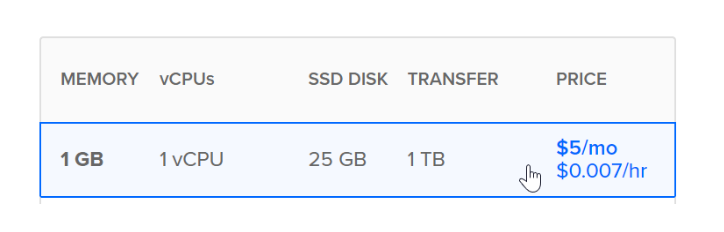
Next, choose a droplet size. Since expfactory is really just a fancy way of serving up webpages, it doesn’t use very much memory, CPU, or hard-disk space. So we’ll use the smallest capacity server, 1GB / 1vCPU / 25GB / 1TB / $0.007/hr. You can of course change this if you find the needs of your server change.
Skip the sections to “Add backups” and “Add block storage”, and go to “Choose a datacenter region.” Usually you will want to pick a region closest to where your users will be, but you might have other reasons for picking a region (e.g., to comply with data privacy regulations).
- Skip the additional options and SSH keys sections.
- Leave the How many droplets? section set to 1 droplet.
Under “Choose a hostname” give it a descriptive (but not-too-long) name, like “my_expfactory”.
Click Create.
SSH into your droplet
Shortly after creating your droplet, you’ll get an email from DigitalOcean that contains your IP, username and password. You can use these to SSH into your server with your software of choice. (PUTTY is a great choice for Windows users). If you are on Mac or Linux, you already have a command line and can use ssh. For example, let’s say I have these credentials
111.222.333.44                                # server ip
with username: dinosaur
and password: WHAT-did-auntie-eat-yesterday   # blueberry pie?
the hostname is expfactory.dynu.net
You would shell in like this:
ssh -XY <username>@<server>
ssh -XY dinosaur@111.222.333.44
It will prompt you for your password to log in.
Basic Server Setup
Once you’ve SSH’d into your server, you need to setup a few things.
Expose Ports
Before continuing, in the case that you are using a cloud-based host, make sure that ports 80 and 443 (for https) are both exposed. It’s terrible when you actually get something working, but you can’t see it because the port isn’t open :) If you are using Digital Ocean, there’s no firewall to begin with so the ports are already exposed (but you can add a firewall if you want to). If you aren’t using Digital Ocean, we are also assuming that you’ve done the correct work to get a domain, and set up the A/CNAME records to support all versions of http/https and www or without.
Install nginx
Run these commands to install nginx
sudo apt-get update && sudo apt-get install -y nginx
Get a hostname
Now we’ll take a slight detour so we can get your server a hostname. This way, rather than connecting to it by IP (e.g., 192.168.1.5) you can connect to it by name (my.domain.com). You also need a hostname in order to get an SSL certificate.
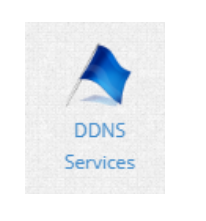
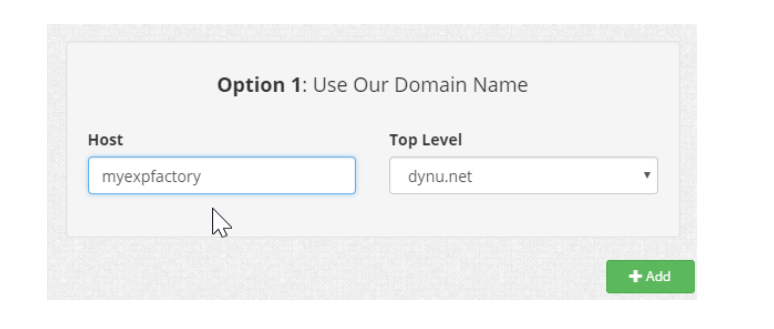
Head over to https://www.dynu.com and create an account. (It’s free). Log into your account and under the Control Panel go to DDNS Services.
On the next page, click the + Add button.
Fill out the Host and Top Level fields under Option 1 using whatever you like. This will be how users access your server (e.g., the options below would allow me to access my server by going to expfactory.dynu.net). Click + Add.
On the next page, change the IPv4 Address to the IP address for your droplet. Change the TTL to 60. Click Save.
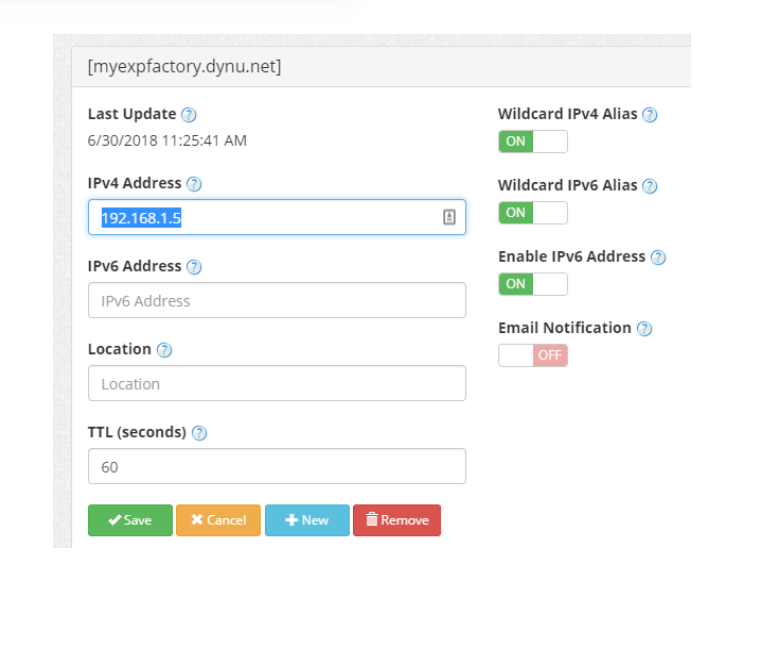
With a few minutes, you should be able to access your server using that hostname.
Install docker
Run these commands to install docker:
sudo apt-get update
sudo apt-get install \
    apt-transport-https \
    ca-certificates \
    curl \
    software-properties-common
curl -fsSL https://download.docker.com/linux/ubuntu/gpg | sudo apt-key add -
sudo apt-key fingerprint 0EBFCD88
sudo add-apt-repository \
   "deb [arch=amd64] https://download.docker.com/linux/ubuntu \
   $(lsb_release -cs) \
   stable"
sudo apt-get update
sudo apt-get install docker-ce
You will first need to add yourself to the Docker group. This consists of two steps:
- Adding yourself to the group
- Restarting the instance
To add yourself to the Docker group:
sudo usermod -aG docker $USER

# restart docker
sudo service docker restart
Then restart the instance. It will kick you off, and you will need to ssh in again.
sudo reboot
Once you log in again, you can test that docker is configured correctly with docker ps. It should show you an empty listing of containers (and not a permissions error). You can also run the hello-world container to test more full functionality.
docker ps
docker run hello-world
Test Nginx
When you install nginx with apt-get, this install typically starts the nginx server (note
this is pronounced ENGINE-X - it took me only 8 years to know that :P). As a sanity check, if you go to the web interface (the domain address that is associated with the droplet) you will see this.
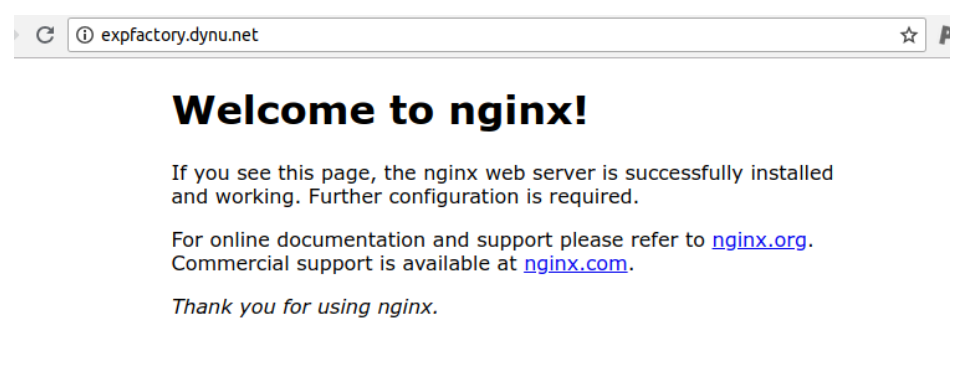
Notice that we do not have ssl, because there isn’t a small picture of a green lock in the address bar. We are going to need to use this local web server to sign our certificates, but then we will stop it to run our experiment container. If for some reason you don’t see this (and your server isn’t started) try:
sudo service nginx start
For this next step, we are still working on the host where you will run your container. What we first need to do is generate certificates, start a local web server, and ping “Let’s Encrypt” to verify that we own the server, and then sign the certificates.
SSL Certificates
We’ll use “certbot” to install and renew certificates.
Step 1. Set some variables
First we’ll set some variables that are used in later steps.
EMAIL="youremail@yourdomain.com"
DOMAIN="expfactory.dynu.net"
The email you set here will be used to send you renewal reminders at 20 days, 10 days, and 1 day before expiry (super helpful!)
Step 2. Install certbot
Certbot automates certificate generation and renewal. In other words, it makes it really easy to setup SSL.
sudo add-apt-repository ppa:certbot/certbot
sudo apt-get update
sudo apt-get install python3-certbot-nginx
Step 3. Get certificates with certbot
Now obtain a certificate by running this command. Note that if you aren’t using a container, or you aren’t the root user, you might need to add sudo.
certbot certonly --nginx -d "${DOMAIN}" -d "www.${DOMAIN}" --email "${EMAIL}" --agree-tos --redirect
Equivalently, if your domain doesn’t have www. you can remove the second -d argument.
Step 4. Stop nginx
Now we need to stop nginx because we have what we need from it!
sudo service nginx stop
Step 5. Copy certs to a new location
Now we’ll move the certs to where they’re expected later.
sudo cp /etc/letsencrypt/live/$DOMAIN/fullchain.pem /etc/ssl/certs/chained.pem
sudo cp /etc/letsencrypt/live/$DOMAIN/privkey.pem /etc/ssl/private/domain.key
sudo cp /etc/letsencrypt/ssl-dhparams.pem /etc/ssl/certs/dhparam.pem
Step 6. Renewal (and remembering to renew!)
Certificates expire after 90 days. You’ll get reminders at 20 days, 10 days, and 1 day before expiry to the email you set before. Before the cert expires, you can run this command to renew:
sudo certbot renew
Before renewing you need to stop the docker container running expfactory and start nginx outside of docker.
For example, if your container is called experiment the commands to stop the container and
renew the certificates might look like this (this is for typical Ubuntu or similar). Before you
do this, if you have any files or content not mapped to the host that you are afraid of losing,
you might consider copying or otherwise backing up. if you’ve mounted a local volume, you should
be okay to stop and re-mount it.
docker stop experiment
sudo service nginx start
sudo certbot renew
sudo service nginx stop
And then issue the command to start your container.
Importantly, when you start the container (that will be generated in the next steps) you will need to bind to these files on the host, and expose ports 80 and 443 too. Now it’s time to generate our container!
The Expfactory Builder Image
The provided expfactory builder image will generate your Dockerfile, and from this file you can build your Docker image. Versons (tags) 3.12 and up (including latest) have support for https. We don’t build the image within the same container for the explicit purpose that you should keep a copy of the recipe Dockerfile at hand. The basic usage is to run the image, and you can either build, test, or list.
$ docker run quay.io/vanessa/expfactory-builder [list|build|test|test-library]
Generally, list will show you experiments provided by expfactory, build is used to generate your custom Dockerfile, and test is used for testing (derp). We will only be covering enough detail here to build container with https. If you want more detail about installation of local experiments or other customization of the Dockerfile, you should refer to the main generate page. You might also look at how to customize your container runtime.
Note that bases for expfactory were initially provided on Docker Hub and have moved to Quay.io. Dockerfiles in the repository that use the expfactory-builder are also updated. If you need a previous version, please see the tags on the original Docker Hub.
Recipe Generation
To generate a Dockerfile to build our custom image, we need to run expfactory in the container, and mount a folder to write the Dockerfile. If we are installing local experiments, they should be in this folder. The folder should not already contain a Dockerfile, and we recommend that you set this folder up with version control (a.k.a. Github). That looks like this:
mkdir -p $HOME/my-experiment/data

# notice we specify a different Dockerfile input that has https
docker run -v $HOME/my-experiment:/data \
              quay.io/vanessa/expfactory-builder \
              build tower-of-london \
              --input build/docker/Dockerfile.https
Finally, before you generate your recipe, in the case that you want “hard coded” defaults (e.g., set as defaults for future users) read the custom build section on the main generate page to learn about the variables that you can customize.
Container Generation
After we run the builder container, a Dockerfile and startscript.sh will be generated
in the folder that we mounted at /data. Starting from this folder on our host, we can now build the experiment container. Note that when you have a production container you don’t need to build locally each time, you can use an automated build from a Github repository to Docker Hub - this would mean that you can push to the repository and have the build done automatically, or that you can manually trigger it. For this tutorial, we will build locally. Here is the content of our folder on the host:
$HOME/my-experiment
├── data/
├── Dockerfile
└── startscript.sh
If you added local experiments (see the main generate page for instructions) we would see them as well:
$HOME/my-experiment
├── data/
├── Dockerfile
├── startscript.sh
└── test-task-two/
Don’t forget to add LABELS to your Dockerfile. A label can be any form of
metadata to describe the image. Look at the label.schema for
inspiration. Then build the image, and replace expfactory/experiments with whatever namespace/container you want to give to the image. It’s easy to remember to correspond to your Github repository (username/reponame).
docker build -t expfactory/experiments .

# if you don't want to use cache
docker build --no-cache -t expfactory/experiments .
Don’t forget the . at the end! It references the present working directory with the Dockerfile. If you are developing and need to update your container, the fastest thing to do is to change files locally, and build again (and removing –no-cache should be OK).
Start your Container
After you do the above steps, your custom container will exist on your local machine. To run our container, we will define the following variables:
port: The-p 80:80is telling Docker to map port 80 (the nginx web server) in the container to port 80 on our local machine. If we don’t do this, we won’t see any experiments in the browser!volumes: The second command-vis telling Docker we want to ensure that the container can see (and use) the certificates on the host.
With SSL
docker run -p 80:80 -p 443:443 \
           -v /etc/ssl/certs:/etc/ssl/certs:ro \
           -v /etc/ssl/private:/etc/ssl/private:ro \
           expfactory/experiments start
...

Starting Web Server

 * Starting nginx nginx
   ...done.
==> /scif/logs/gunicorn-access.log <==

==> /scif/logs/gunicorn.log <==
[2017-11-11 16:28:42 +0000] [1] [INFO] Starting gunicorn 19.7.1
[2017-11-11 16:28:42 +0000] [1] [INFO] Listening at: http://0.0.0.0:5000 (1)
[2017-11-11 16:28:42 +0000] [1] [INFO] Using worker: sync
[2017-11-11 16:28:42 +0000] [35] [INFO] Booting worker with pid: 35
The above is telling us that the webserver is writing output to logs in /scif/logs
in the image, and we are viewing the main log. The port 5000 that is running the Flask
server is being served via gunicorn at localhost.
If https is working, this means that if you open your browser to localhost (https://127.0.0.1) you will see your experiment interface! When you select an experiment, the general url will look something like https://127.0.0.1/experiments/tower-of-london. Now try hitting “Control+C” in the terminal where the server is running. You will see it exit. Refresh the browser, and see that the experiment is gone too. What we actually want to do is run the server in detached mode. After you’ve Control+C, try adding a -d to the original command. This means detached.
docker run -d -p 80:80 -p 443:443 \
           -v /etc/ssl/certs:/etc/ssl/certs:ro \
           -v /etc/ssl/private:/etc/ssl/private:ro \
           expfactory/experiments start
2c503ddf6a7a0f2a629fa2e55276e220246320291c14f6393a33ef54ab5d512a
The long identifier spit out is the container identifier, and we will reference it by the first 12 digits. Try running docker ps to list your active containers - you will see it is the first one! And look at the CONTAINER_ID:
$ docker ps
CONTAINER ID        IMAGE                COMMAND                  CREATED             STATUS              PORTS                          NAMES
2c503ddf6a7a        vanessa/experiment   "/bin/bash /starts..."   10 minutes ago      Up 10 minutes       0.0.0.0:80->80/tcp, 5000/tcp   zealous_raman
You can also use the name (in this example zealous_raman) to reference the container, or give it your own name with --name when you run it. For more details on how to customize your container, including the database and study id, see the usage docs.
Finally, you will likely want to bind the data location in the container to your host, so that
if the container stops and goes away, the data persists.
docker run -d -p 80:80 -p 443:443 \
           -v /etc/ssl/certs:/etc/ssl/certs:ro \
           -v /etc/ssl/private:/etc/ssl/private:ro \
           -v $PWD:/scif/data \
           expfactory/experiments start
Now that your container is running, you can refer to the previous page to learn how to shell into and otherwise interact with your container.